Invoice Approval & Assigning Approvers at line level
Using invoice line level approval is an effective way to allocate multiple approvers to individual line items on an invoice.
Assign invoice approvers at header level
Assign invoice approvers at line level
Introduction
You are able to approve invoices in total or by assigning different Users to individual invoice lines. This gives you greater flexibility and control over the approval process.
Approvals Process
The approvals process allows multiple approvers to approve an invoice at both header and at line level. Once all lines have been approved, the invoice as a whole must then be approved at the Header stage to ensure all details are accurate and coding has been completed. This also ensures full accountability on the processing of the invoice.
The workflow
Assign Approvers: The first stage is to assign the approvers for the invoice.
1st Approvals: After the approvers have been assigned at both header level and line level and the invoice has been checked in, it can carry on to the 1st approvals stage. At this stage, all line level approvals are completed first.
The header level 1st approver will then approve the invoice as a whole.
If you are running dual approvals, it will move on to the 2nd Approvals stage. If you are not running dual approvals, it will go directly to the Process stage.
2nd Approvals: As per the 1st approvals process, line level 2nd approvals are completed first, followed by Header level 2nd approvals.
Once complete, the invoice will move on to the Process stage.
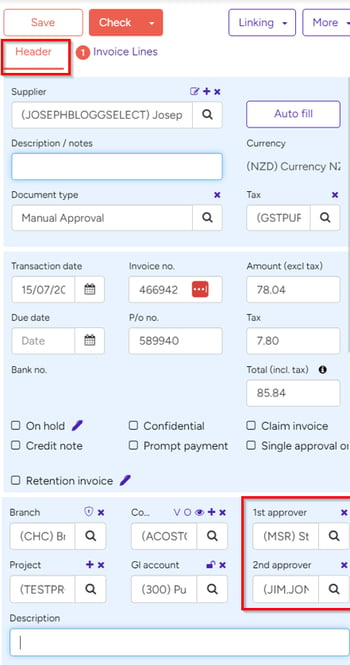
Assign invoice approvers at header level
In the invoice check queue, select the invoice to assign approvers to.
- Go to the Header tab, where you can allocate the 1st and 2nd approvers.
- Click Save.
These approvers will be accountable for the invoice as a whole to ensure all details are accurate and approvals have been completed correctly.

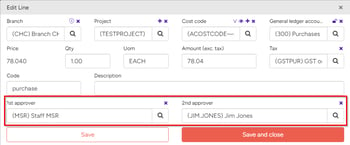
Assign invoice approvers at line level
To be able to select different approvers at invoice line level, you need to have the field Enable invoice analysis line approval ticked in the Administration > Settings page, in the Invoice Automation Module column.
- In the invoice check queue, select the invoice to assign approvers to.
- Click the Invoice lines tab, then double click a line item to allocate the approvers for this line.
- Click Save and close.

Note: If you have assigned a user as an approver at the header level, then by default they will initially be assigned to all the individual line items.
Once all approvers have been assigned, both at header level and line by line, you can check in the invoice to move it through to the approvers' queues.
Approve invoice items line by line
Invoices with line items to be approved will appear in the appropriate dashboards/queues for each approver.
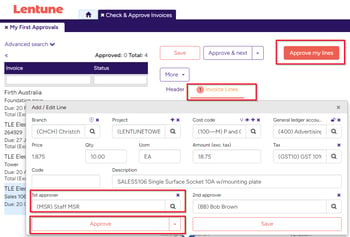
Where a line has been assigned to you, it will be a different colour to the lines assigned to other users. This makes it easy to identify the lines that you are responsible for approving.
- Double click your allocated line items one by one, confirm the information is correct, or make any changes as necessary.
- Click Approve.
- Alternatively, you can click Approve My lines at the top of the screen to approve all lines that have been assigned to you.

Once all line items have been approved the invoice will appear in the queue of the User who is set as an approver at the invoice header level. It will then need to be approved by that User in order to take it to the next stage in the approval workflow.
All Users who have been assigned to line items in the invoice will have full visibility of the invoice.
This will allow them to change how the individual lines are coded. However, they will only be able to approve line items that are coded to Cost codes that they have Access policies for.
KEY POINTS
Header Approvers must approve the invoice as a whole, after the lines have been approved, in order to continue the workflow.
Approvers assigned at line level will have full visibility of the invoice details, however they will only be able to make changes on Projects that they have valid Access policies for.
Enable line by line approvals
To use invoice approval by line, you must edit the Settings to allow this feature.
- Go to Administration > Settings and on the General tab and in the Invoice automation module section:
- Scroll down to find and check the flag for Enable invoice analysis line approval.
- Click Save and Close.
Need more help? We’re here! We hope our article was helpful! If you need more info or want to connect, drop us an email at support@lentune.com.
Thank you. We love to hear from you!
Last updated: 18 January 2024