Email address for a new Payable account
Link by Keyword from the Invoice screen
Link by Branch, Project or Supplier from the Invoices screen
Manage Keywords from a Project, Branch or Supplier
Introduction
When you have the email address for incoming invoices set up correctly, Lentune can match the invoices with the correct Payable account /Supplier. This needs to be set up only once for the specific email address.
If an invoice comes in without a recognised email address, it can be linked to the correct Payable account / Supplier by one of the methods below.
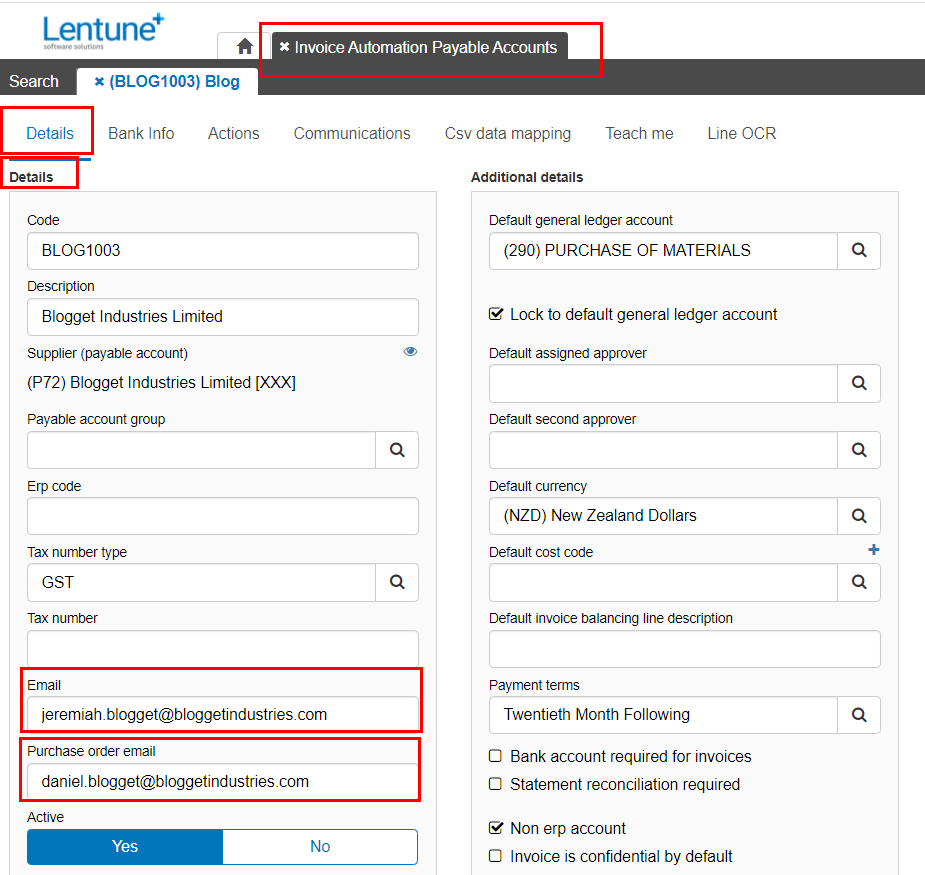
Email address for a new Payable account
When creating a new Payable account, ensure that you have the correct email addresses set up for the Payable account / Supplier. This will be the email address that the invoices will come from, which allows Lentune to identify the Supplier when invoices arrive.
Also, if you are using Purchase Orders, you can also set up the email address that Purchase Orders will be sent to.
- Go to Administration > Payables.
- Search for and select the Payable account you wish to check.
- Go to the Details tab > Details section.
- For Invoices: add or check the email address in the Email field.
- For Purchase Orders: add or check the email address in the Purchase order email field.
- Click Save and Close.
Unknown Payable Invoice
When an invoice comes in to the Unchecked invoices screen, and goes to Unknown Payable Invoice, then the email address hasn't yet been recognised.
- Go to Invoice Automation > Check.
- Select the invoice to check.
- Add or select the required Payable account / Supplier in the Supplier field.
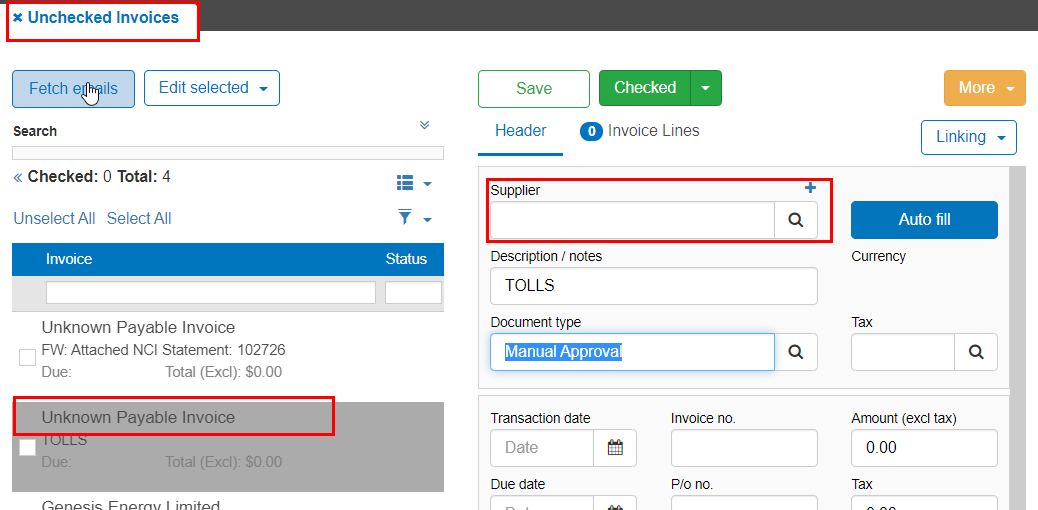
- Click Linking > Link Email With Account.
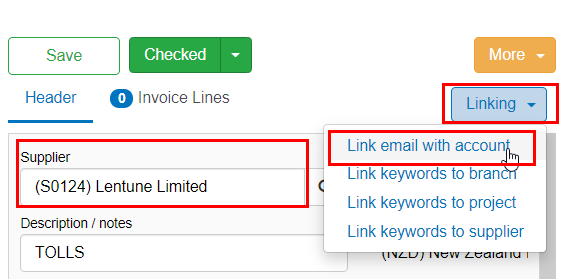
This will take you to the Link Email with Supplier screen:
If there are existing addresses for the Payable account, they will show in the Current Supplier email address field.
The field for Email To Link will show the address that the invoice was received from.
If this is the Payable / Supplier's correct email address:
- Click Confirm. This will link it for future invoices.
- Enter the correct email address.
- Click Confirm.
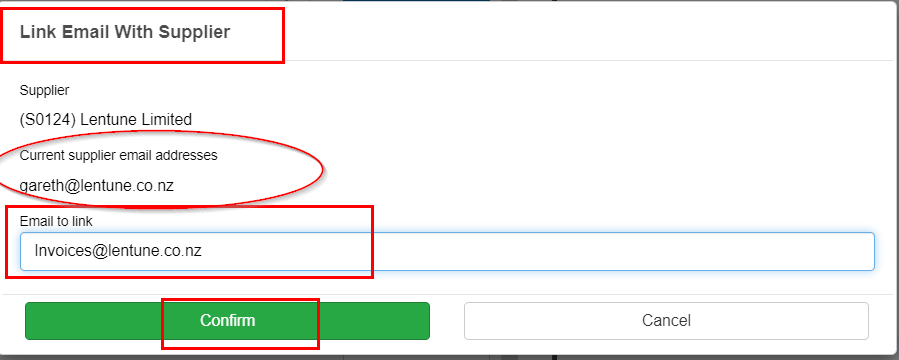
NOTE: If the email address belongs to an internal staff member or is a generic address (such as one from Xero that goes on all Xero invoices), then DON'T link it.
It must be an address that is unique to this Payable / Supplier.
Link by Keyword from the Invoice screen
Where you have multiple Payable accounts / Suppliers using the same email address to send invoices, for example, when a parent company has multiple subsidiaries that all send invoices from the same head office, you can link by Keywords.
If there's a word that's unique to that Supplier and appears only on their invoices and not for any other Supplier, then you can use that as a keyword to differentiate that Supplier from the others with the same addresses.
- Go to Invoice Automation > Check .
- Select the invoice to check.
- Click Linking > Link keywords to supplier.
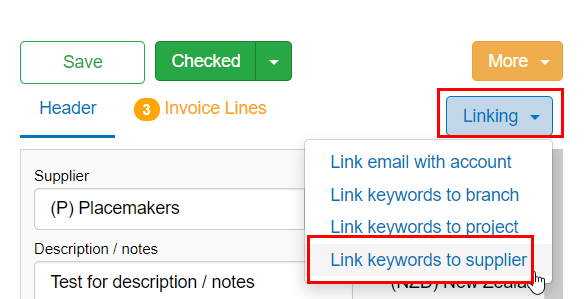
This takes you to the Link Keywords screen.
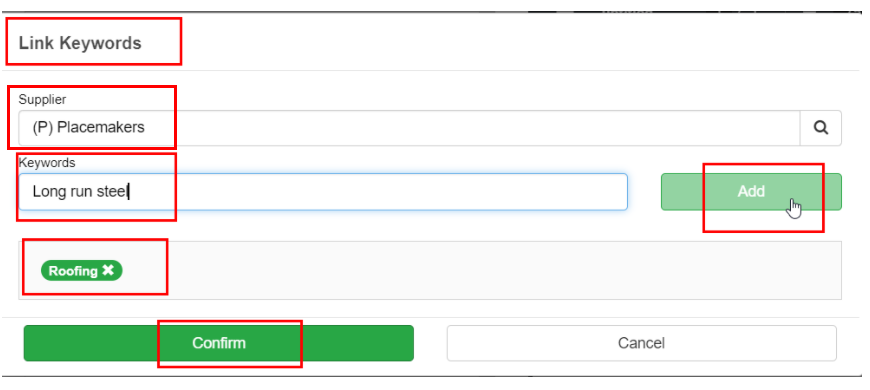
- Enter the Supplier you wish to link to the keyword.
- Enter the unique keyword/s.
- Click Confirm.
Link by Branch, Project or Supplier from the Invoice screen
You can link keywords to a Branch, a Project or a Supplier to auto-populate the Branch and Project fields.
NOTE: Please be careful to link only unique words that won't appear on other invoices. If you use a word that is too generic and it appears on other invoices, then those Branches / Projects will be applied to the other invoice.
- Go to Invoice Automation > Check.
- Select the invoice to check.
- Click Linking > Link keywords to branch, OR:
- Click Linking > Link keywords to project, as required.
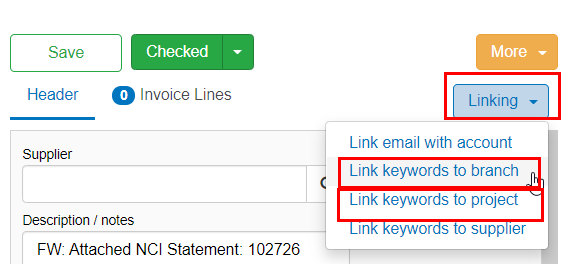
This takes you to the Link Keywords screen.
BRANCH example:
- Select the Branch you want to link to.
- Enter the keyword/s and click Add. The word will then appear in the field below.
- Click Confirm.
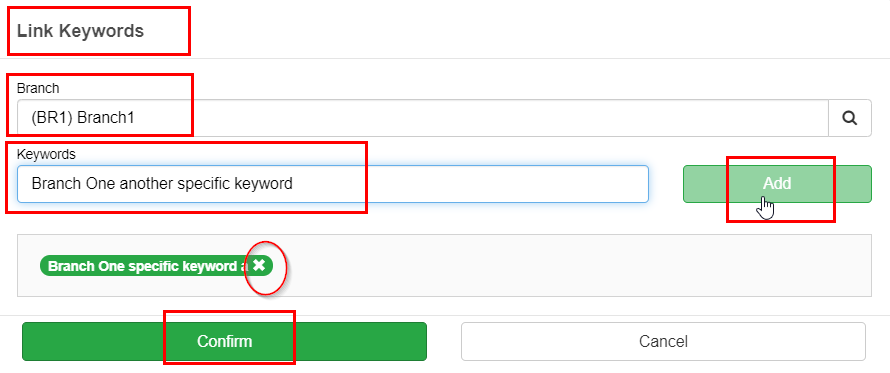
If you wish to remove a keyword:
- Click the X icon
 beside that keyword to remove it.
PROJECT example:
- Select the Project you want to link to.
- Enter the keyword/s and click Add. The word will then appear in the field below.
- Click Confirm.
If you wish to remove a keyword:
- Click the X icon beside that keyword to remove it.
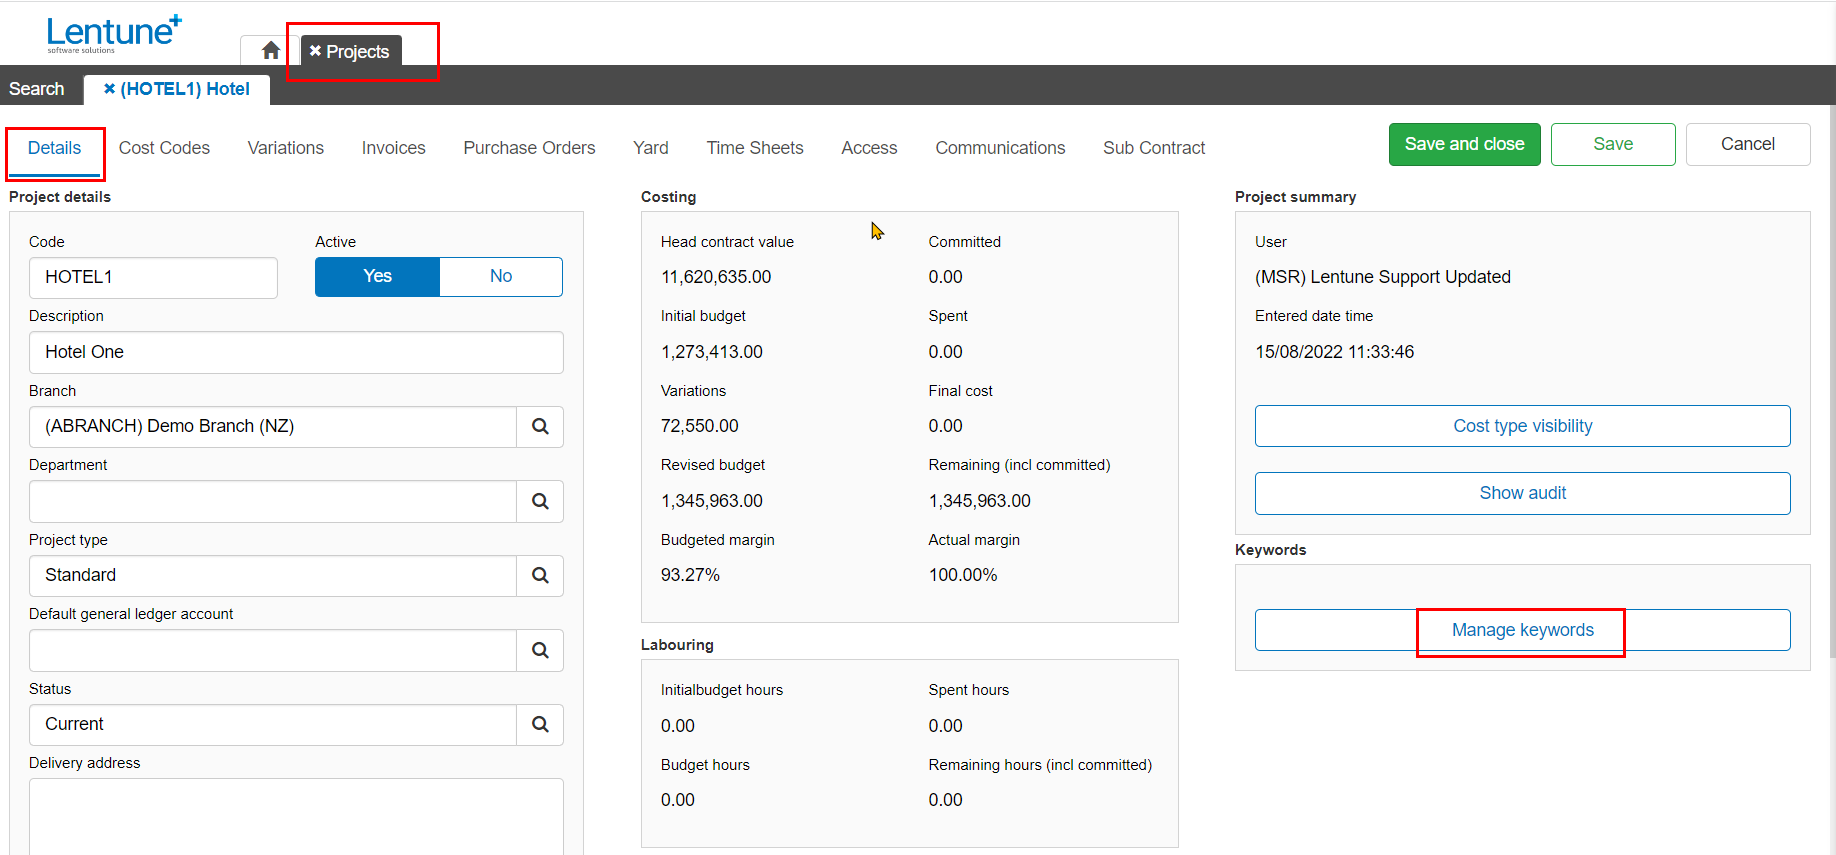
Manage Keywords from a Project, Branch or Supplier
If you want to link several keywords at once, you can do this by the Project, the Branch or the Supplier. We'll look at a Project. However, the functionality is the same in the Branch and Supplier.
Project
- Go to Administration > Project.
For the Branch or Supplier:
- Go to Administation > Branch, and select your Branch, or;
- Go to Administration > Payable, and select your Supplier.
-
Select the Project you want.
On the Details screen:
-
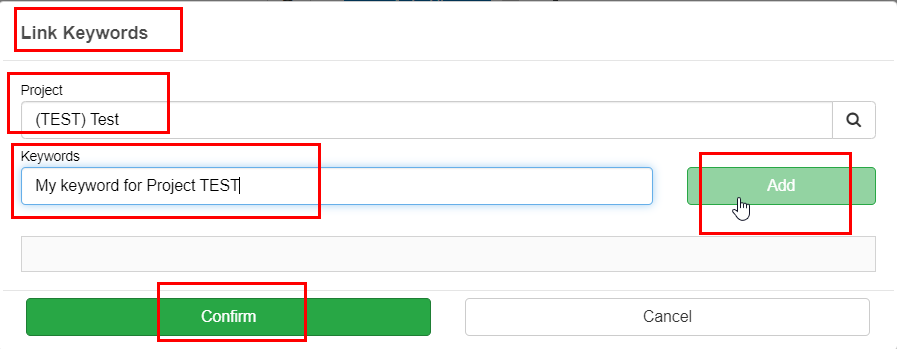
Click Manage Keywords on the lower right hand side.
In the Link Keywords screen:
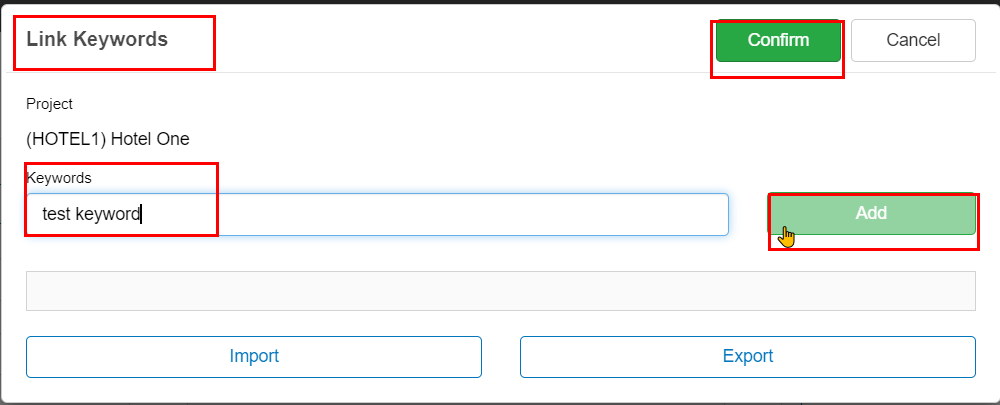
The Project is displayed.
-
Keywords: Enter the first Keyword that you wish to add.
-
Click Add.
Continue adding any other keywords.
-
Click Confirm.
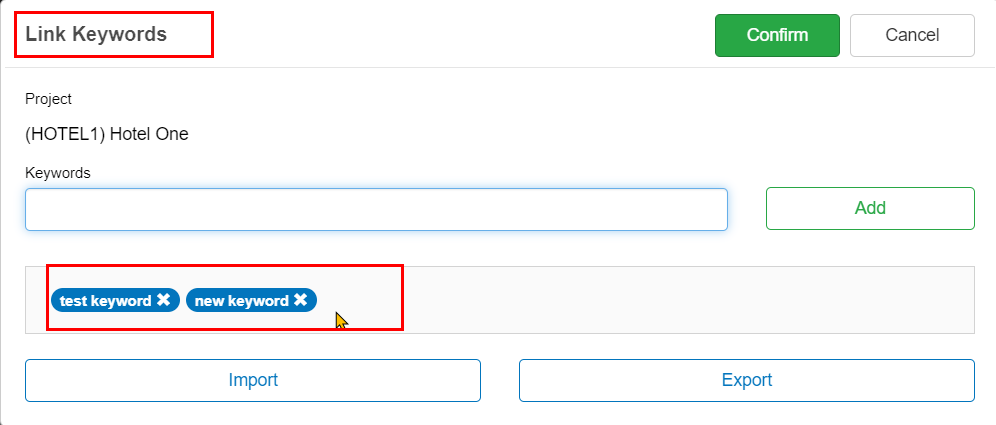
You can see a list of Keywords for this Project below the Keyword field.
If you wish to delete any Keyword:
-
Click the X icon
 to the right of that Keyword.
Import / Export Keywords from a Project, Branch or Supplier
You can also export the list of Keywords to an excel spreadsheet, edit the list and re-import it. The export routine will export all Keywords for all Projects, with fields for the Project name and the Keyword. When importing, you have the option either to delete any keywords that are not in your new spreadsheet and import everything, or importing only new keywords.
Export Keywords
To export all keywords for all Projects:
-
Click Export.
A spreadsheet will be downloaded.
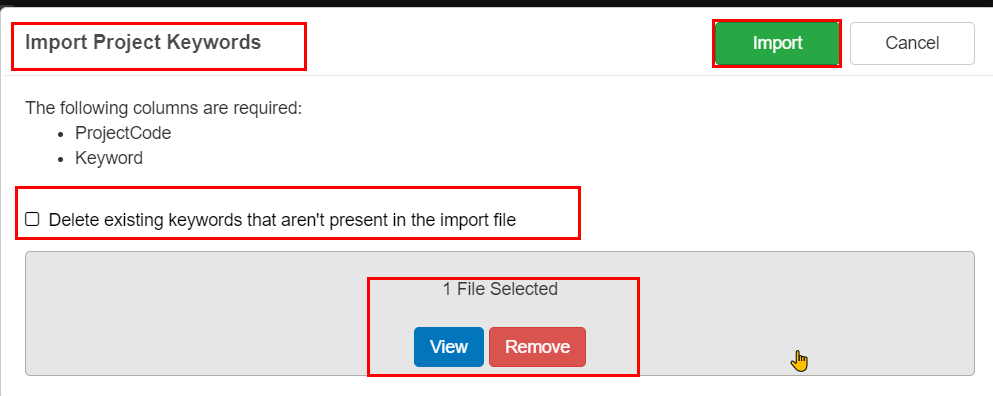
Import Keywords
To import keywords from a spreadheet for all Projects:
-
Click Import.
-
Delete existing keywords that aren't present in the import file: Check this field only if you want to remove keywords that are not in your file to import. Otherwise leave this field unchecked.
-
Select your file to import.
-
Click Import.
This routine will import keywords to the relevant Projects.
Teach Me Rules and OCR
Incoming invoices are read by a combination of Teach Me Rules and OCR (optical character recognition).
Teach Me Rules fill in the header details, such as dates, invoice numbers and total values.
OCR reads the line details.
If you find an invoice where the Teach me rules haven't automatically populated or it's populated with incorrect details, please enter the details manually.
As soon as the invoice has been checked, Lentune will be notified either that there were no rules or that the rules were incorrect. Our team will then update and correct those rules.
If you come across OCR rules which are incorrect, please contact as at
and we can correct them.
Was this helpful? If you require further assistance, or would like to contact us about this article, please email us at support@lentune.com.
Thank you. Your feedback is appreciated.
Last updated: 6 September 2022