Introduction
The Purchase Order module in Lentune is a powerful tool for managing your procurement processes. To get started, you'll need to configure the Purchase Order Manager. In this guide, we will walk you through the steps to activate the module, define messages for Purchase Orders, and set specific fields for your preferred search criteria for stock items.
Enable the Purchase Order Module
To enable this module please email support@lentune.com
Purchase Order Messages
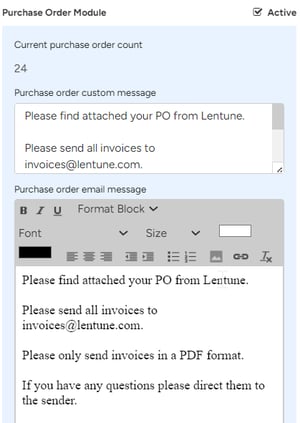
Next, you can set up the text for the messages that will appear on your printed and emailed Purchase Orders and Purchase Order Statements.
Navigate to Administration > Settings
- Purchase order custom message: Enter the message you would like to print on your Purchase Orders.
- Purchase order email message: Enter the message for your emailed Purchase Orders. It could be the same as the first message.
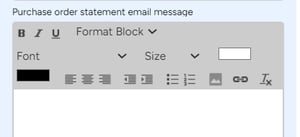
- Purchase order statement email message: Enter the message for your Purchase Order Statements, if you will use these.
Select Your Settings
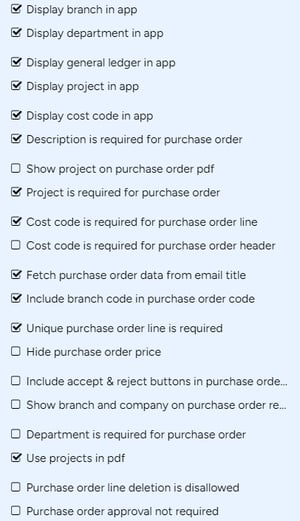
Now, choose your preferred settings to determine which fields are mandatory for users when entering Purchase Orders and which optional fields to display on Purchase Orders.
These selections determine which fields must be completed on a Purchase Order and which fields are shown on the printed or emailed Purchase Order, as well as additional settings.
- Display branch in app: Display the option to change the branch in the app.
- Display general ledger in app: Display the option to change the general ledger code in the app.
- Display project in app: Display project in the app.
- Display cost code in app: Display cost code in the app.
- Description is required for purchase order: Enforce users to enter a description for their Purchase Orders (recommended).
- Show project on purchase order PDF: Display the Project description on the Purchase Order sent to your supplier.
- Project is required for purchase order: Enforce entering the Project Code for the Purchase Order if you are using Projects in your coding structure.
- Cost code is required for purchase order line: Enforce entering a Cost Code for every line of a Purchase Order.
- Cost code is required for Purchase Order header: Enforce entering a Cost Code on the header of a Purchase Order.
- Fetch purchase order data from email title: Leave unchecked unless relevant to your workflow.
- Include branch code in purchase order code: Add the Branch Code as a prefix to your Purchase Order numbers if needed.
- Unique purchase order line is required: Necessary for simPRO integration.
- Hide purchase order price: Hide pricing from suppliers on the Purchase Order.
- Include accept & reject buttons in purchase order email: Include Accept and Reject buttons on emailed Purchase Orders. (Consider keeping this turned off initially).
- Show branch and company on purchase order report: Display the Branch and Company names on your Purchase Orders.
- Department is required for purchase order: Not applicable to current customers.
- Use projects in PDF: Show the Project on the PDF of the Purchase Order.
- Purchase Order line deletion is disallowed: Prevent users from deleting a Purchase Order line.
- Purchase order approval not required: Do not run a Purchase Order approval workflow.
- Click Save and Close to apply your settings.
With your Purchase Order module configured, you're now ready to start entering Purchase Orders efficiently and effectively.
Need more help? We’re here! We hope our article was helpful! If you need more info or want to connect, drop us an email at support@lentune.com.
Thank you. We love to hear from you!
Last updated: 30 October 2023