Preview or Duplicate your Order
Save and Send your Purchase Order
View Audit log of Purchase Order actions
Update the Status of a Purchase Order
Introduction
If your business does not require Purchase Orders to be approved, you can opt out of the approval process. Refer below to read about this.
Create a Purchase Order
- Go to Invoice Automation > Purchase Orders.
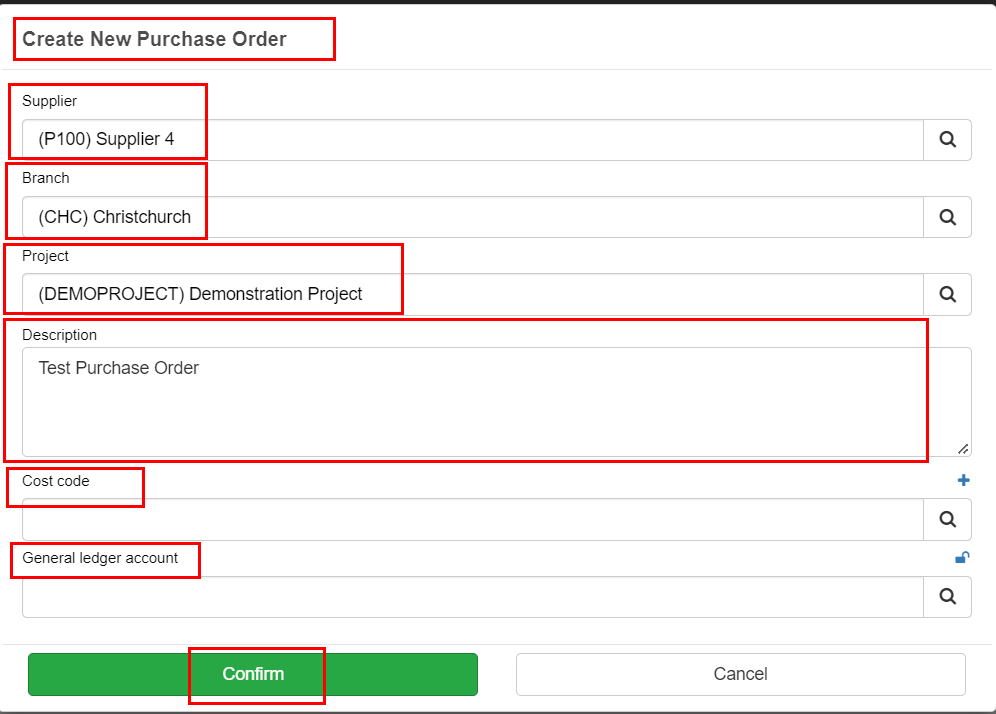
- Click New purchase order.
- Select the Supplier, Branch, and Project from the dropdown lists.
- Enter a Description for this order. This is a description of the order, not the line items.
- Select a Cost Code and General Ledger, if required.
- Click Confirm.
Order tab
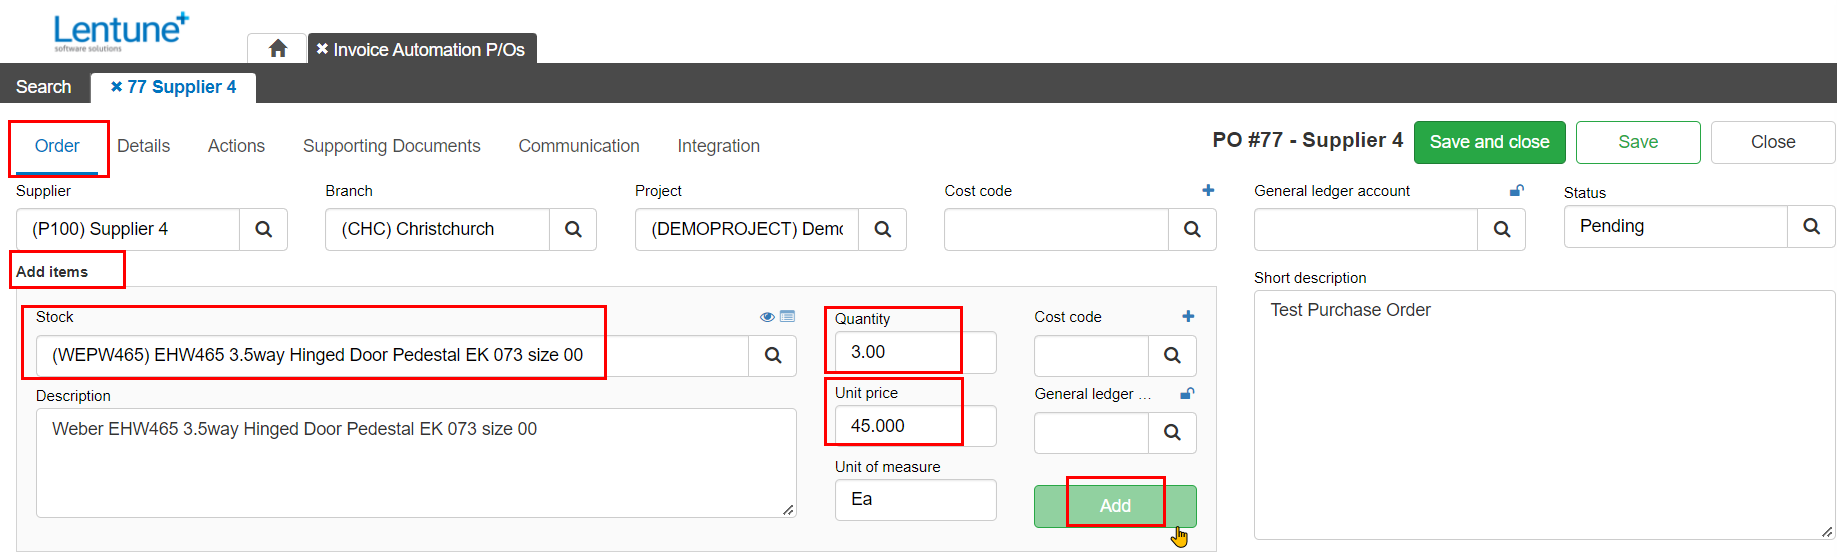
This takes you to the Order screen to add the Stock items you wish to order.
In the Add Items section:
- Stock: Search and select the Stock item.
TIP: If your Supplier price files have not been imported, add the item details in the Description field.
- Quantity: Enter the number of this item.
- Unit price: Enter the price (if known). You can enter the amount inclusive or exclusive of GST/Tax. If you enter the net price before tax, and the system calculates the GST when the Purchase Order is saved and sent. If you enter the gross amount including GST / Tax, you can tick the Unit price including tax field and the system will then calculate the net amount and GST component.
- Unit of measure: Enter the unit if measurement (if known).
- Click Add.
- Repeat the above steps to add more items to your Purchase order.
When you have finished adding items, go to the Details tab:
Details tab:
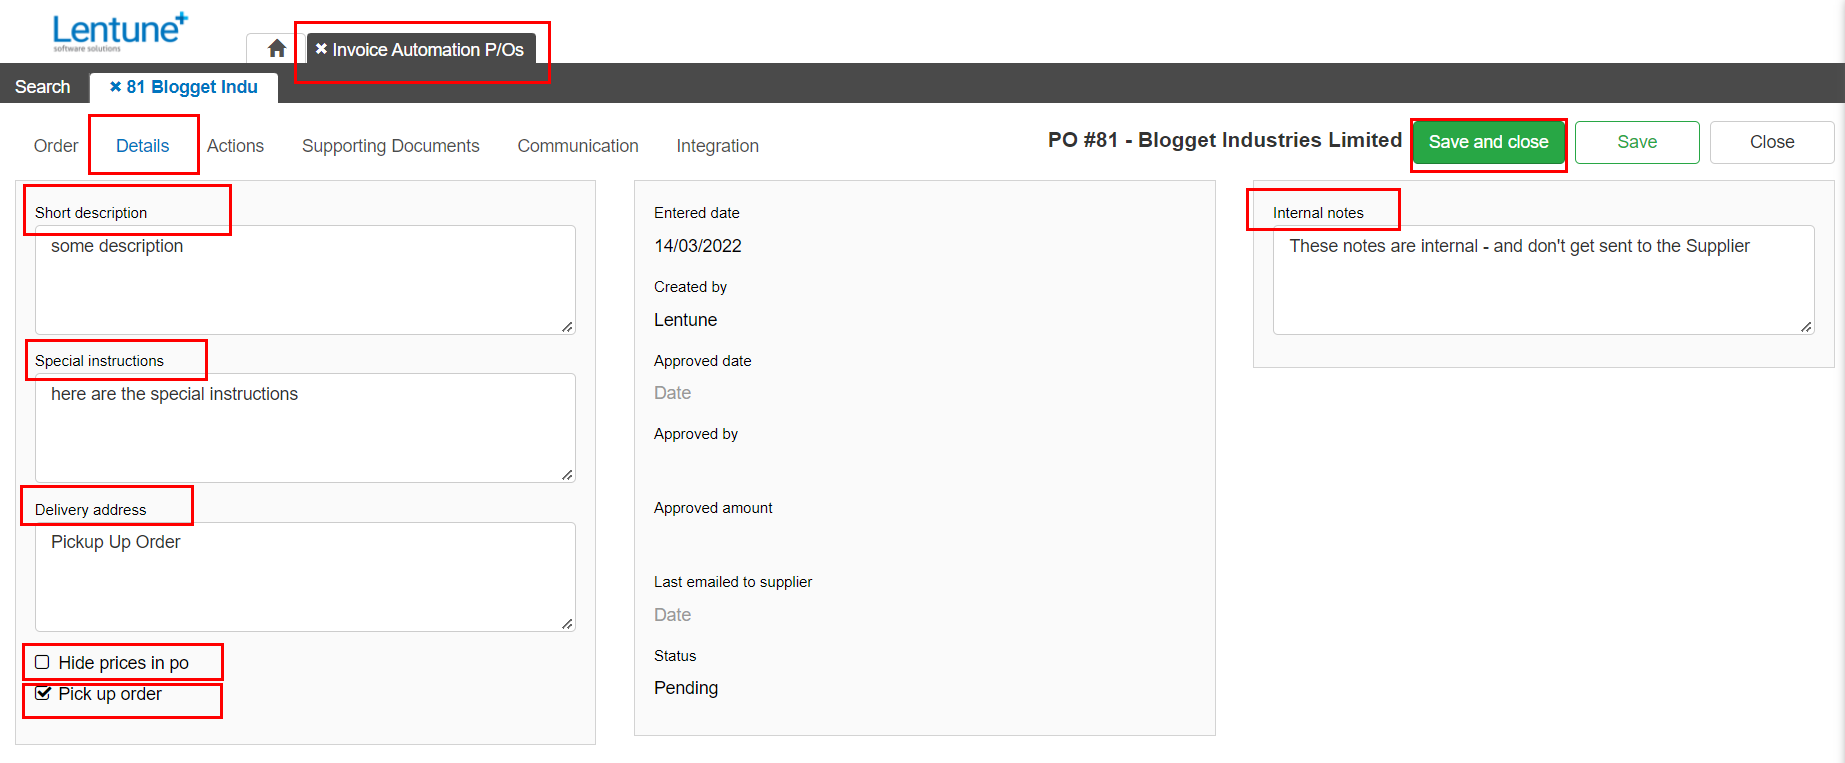
- Click the Details tab from your header menu.
- Add any Special instructions and the Delivery address.
TIP: We can automatically populate your delivery address for an order by saving the delivery address for a Project in your Project settings.
- Determine whether to Hide prices in the Purchase Order and whether this is a Pick up order.
- Internal notes: Enter any notes that are required for internal use. This is not sent on the Purchase Order to the Supplier.
Actions tab
In the Actions tab, you can Preview the Purchase Order, Duplicate the Purchase Order, Email the Purchase Order, Show integration log, Show Access Policies, Show audit logs.

Add a Supporting Document
You can update multiple Supporting Documents. Refer here to read about this.
- Go to the Supporting documents tab.
- Click Supporting Documents.
- Select the document/s you wish to upload.
- Click Upload document.
Preview or Duplicate your Order
On the Actions tab you can Preview, Duplicate or Email the Purchase Order.
- Click Preview to view the Purchase Order.
- Click Duplicate order to clone this Purchase Order to a new one, and email it.
Save and Send your Purchase Order
The Purchase Order now has a Status of Pending, and needs to be validated to move on.
This is done by clicking Email and close, either on your desktop or in the mobile app.
Where you are using the approval workflow, but the User does not have the Access Persona to allow them to self-approve the invoice, based on total amount that they may approve, then it will move to the Status of Awaiting approval. Otherwise it will move to the Status of Awaiting goods.
The Status is shown on the front screen of the Purchase Order.
After you have Emailed the Purchase Order, the Approver will receive a notification on their mobile phone that there are Purchase Orders waiting for their approval. They can search for these in the Purchase Order screen, by selecting the My awaiting approvals field.
To Send your Purchase Order:
When you have added all stock lines and other details for your Purchase Order:
- Click Save and Close.
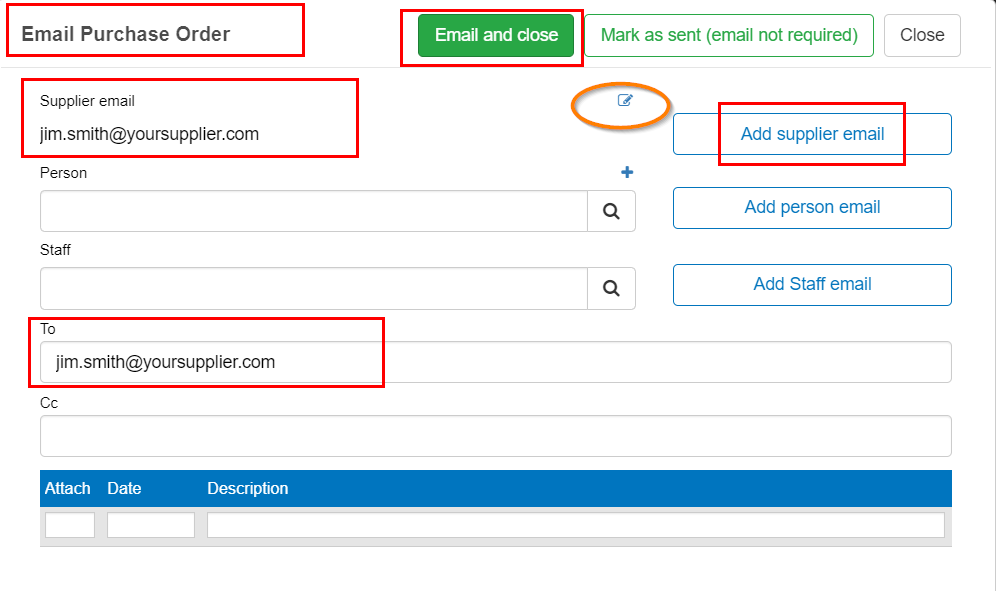
This takes you to the Email Purchase Order screen.
Here you can select who you wish to email the Purchase Order to.
- If there is a Supplier email displayed, it will appear in the To field. If there is no Supplier email address, you can add one. Refer below. Then click the To field, and then click Add supplier email to add that email address to send to.
- You can select from the dropdown list, or add a Person email. Click the blue plus icon
 to add a new Person email address.
- Then click the To or Cc field, and click Add person email to send the Purchase Order to that person.
- You can select a Staff email address from the dropdown list to send this Purchase Order to.
- Then click the To or Cc field, and click Add staff email to send the Purchase Order to that person.
When you have selected the email addresses you need:
- Click Email and close.
The audit log will show the date and time that the email was sent. To view this, go to the Actions tab on the Purchase Order.
If you click Mark as sent (email not required), no email will be sent. The audit log will also be updated.
Add a Supplier email address
If there is no Supplier email, you can add one while you are in the Email Purchase Order screen.
- Click the Edit icon
 to the right of the Supplier email field.
- Add the email address.
- Then click Save to return to the Email Purchase Order screen to Email the Purchase order.

Invalid email
If the Purchase Order is sent to an invalid email address and bounces, the User will receive an email notification to advise them of this.
View Audit log of Purchase Order actions
You can review actions that have been made for a Purchase Order.
In the Purchase Order to wish to view:
- Go to the Actions tab
- Click Show audit logs.

Edit a Purchase Order
- Go to Invoice Automation > Purchase Orders.
- Search by Keywords, Project, User filter or Advanced search to find the Purchase Order you wish to edit. If you do not have any details, leave these blank.
- Click Search.
- Double click the Purchase order you wish to edit.
- Make any necessary changes or add any new items using the steps above.
- Click Save and Close.
You will be taken to the Email Purchase Order screen:
-
If you wish to re-send the Purchase Order, click Email and close.
-
If it is not necessary to re-send the Purchase order, click Mark as sent (email not required).
Return to Top of Page
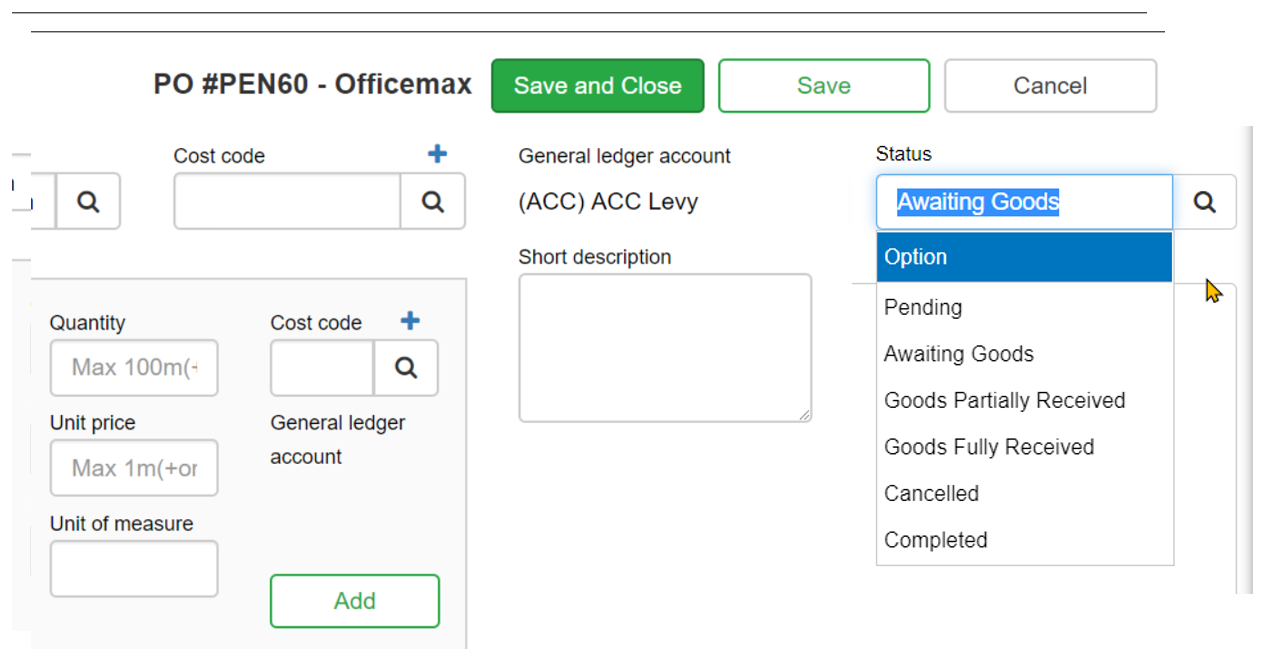
Update the Status of a Purchase Order
To update the Status of a Purchase Order:
- Go to Invoice Automation > Purchase Orders.
- Use the Keywords, Project, User filter or Advanced search to find the Purchase Order you wish to edit. If you do not have any details, leave these blank.
- Click Search.
- Double click the Purchase order you wish to edit.
- Change the status of the Purchase order in the Status field. Options are Pending, Awaiting goods, Goods Partially Received, Goods Fully Received, Cancelled, Completed.
- Click Save and Close.
You will be prompted to send your Purchase order.
-
- If you wish to send now, click Email and close.
-
- If not, click Mark as sent (email not required).
NOTE 1:
The Status of a Purchase Order cannot be moved from Pending until it has been validated using the Save and Close button, (or done on the mobile app).
NOTE 2:
The Status of a Purchase Order can be updated in the Check and Approve Invoice screens.
- After selecting the invoice, click on the PO header.
- Click Goods Partially Received, or Goods Fully Received.

Purchase Order Approval required or not required
If your business does not require Purchase Orders to be approved, you can opt out of the approval process.
If you do want to use the Approval process for Purchase Orders, this step is not necessary.
- Go to Administration > Settings.
- Go to the General tab > Purchase Order module section.
- Scroll down to find the field Purchase order approval not required.
- Check this field.
- Click Save and Close.

l l
l l

Watch the video 
Prefer to watch the video? Charlie takes you through the process here.
Need more help? We’re here! We hope our article was helpful! If you need more info or want to connect, drop us an email at support@lentune.com.
Thank you. We love to hear from you!
Last updated: 13 February 2024