What I need to set up beforehand
Introduction
What to prepare and how to set up CSV file mapping to automatically pull invoice information from your inbox directly into Lentune.
What I need from my Suppliers
- Invoices in PDF format.
- CSV file with line data from your invoices.
What I need to set up beforehand
- You will need to ensure an incoming email address for the payable account is specified.
This will be used to identify what payable the invoices and CSV's are coming from. To associate the correct payable and mapping rules to pull the data in this email MUST be specified.
Import the CSV
The information will pull directly from your inbox.
Once you have set the mapping rules, Lentune will use the incoming email address to identify the Payable account and the associated mapping rules to import both the PDF and CSV invoice information in to Lentune.
Once you have the details required from your Suppliers, you can teach Lentune to read the CSV files and populate the right line details for your invoices to pull directly from your inbox.
Setup
- Start at Administration > Payables.
- Select for the Payable account you wish to setup CSV line item reading for.
- Select Csv data mapping.
- Open up your CSV side by side with Lentune.
- Determine whether you want to use the Column Names or Column Numbers to identify what data to extract and populate in Lentune.
-
- If your file has one invoice per row, then you can use the Column name to identify what data to extract to the associated field in Lentune.
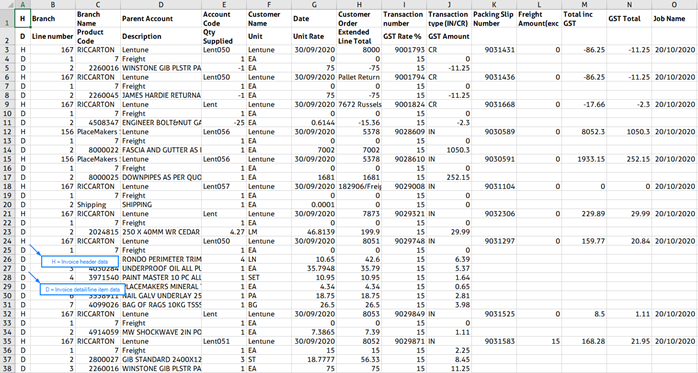
- If your file has multiple rows per invoice, i.e. A row for Header details and rows for line-item details, then use the Column Number to identify what data to extract to the associated field in Lentune.
Hint: If you are mapping a Placemaker CSV file, then you will need to use the Column Number process to map.
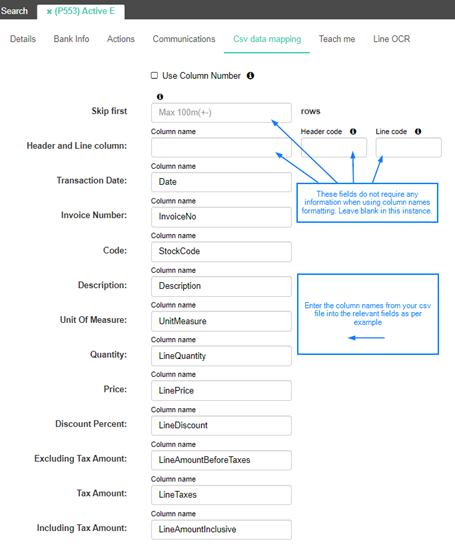
Using Column Names
-
Leave the Skip First, Header and Line column, Header code & Line code fields blank. We will use the Column name to identify what field to extract.
-
For each of the following fields, include the Column name where you can find the designated data to extract.
-
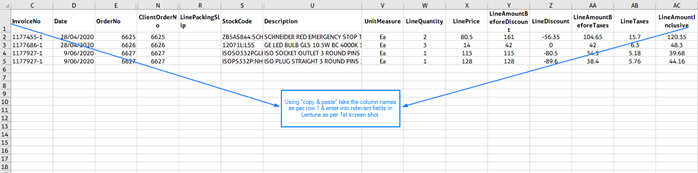
If the column that holds the Invoice Number is called Transaction Number in the file, then populate Transaction Number in the Invoice Number field.
-
Make sure the spelling and Column name that you type in is identical to what is listed in the file. It is suggested you copy & paste to ensure accuracy.
-
-
After you’ve added each Column name in the associated field click Save and Close to save your extractions.
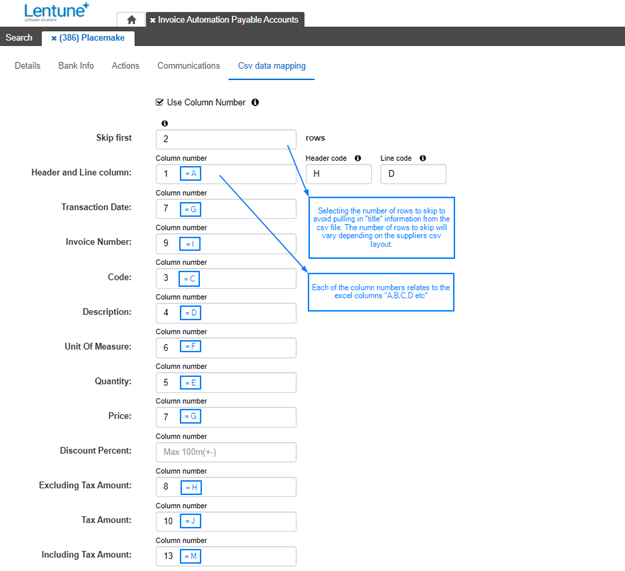
Using Column Numbers
- Tick the Use Column Number box at the top of the screen to indicate you will be using the Column number to identify the data you wish to extract.
- Indicate the text that identifies whether the row is a Header row (relates to the overall details of the invoice such as Transaction date, Invoice Number, PO Number and Invoice totals) or a Line-item row (details relate to the items listed on the invoice) in the Header code and Line code fields.
- Determine how many lines to skip in the file. This will correlate to the file headers at the top of the screen. List the number of rows to skip in the Skip First.
- If your file has two rows of header text, then choose to skip 2 rows and populate 2 in the Skip first field.
- List the Column number where the file lists the text indicating whether it is a Header or Line row in the Header and Line column.
- For each of the following fields, include the Column number where you can find the designated data.
- For example: If the 3rd column lists the Transaction Date for the invoice, then populate 3 in the field for Transaction Date.
- Click Save and Close to save your extractions.
Hint - For Column Numbers CSV: Add a row on the top of your file and insert a row. Then add the column number for each "A, B, C" column to make the process easier when mapping.

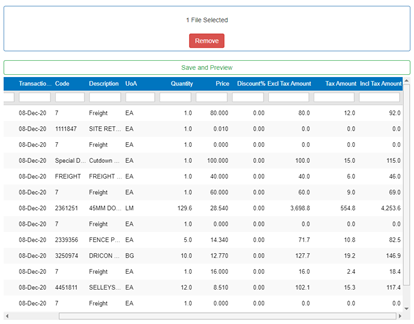
Preview the Mapping
You can check how you have set up your file and make sure the right details are being extracted. Check the details that we are extracting are correct in the grid below
- Drag and drop your CSV file into the drag file here or click to browse window,
- Click Save and Preview to view and check that the data mapping is accurate.
- Click Save and Close.
Example of Column Number CSV mapping
Example of Column Name CSV mapping
Need more help? We’re here! We hope our article was helpful! If you need more info or want to connect, drop us an email at support@lentune.com.
Thank you. We love to hear from you!
Last updated: 30 May 2024