Assign the Security Roles to the Security Group
Add User to the Security Group
Introduction
You can set up a User as an auditor and allow them access to search and view data for auditing purposes, but not edit them. We go through the steps to set up an Access Persona, then set up and assign the User a Security Group with Security Roles to allow this access.
Read Add an Access Persona and Assign Security Group to a User to learn how to assign these properties to a User.
You will need to:
- Add a User for your Auditor.
- Assign a Security Group with the necessary Security Roles. If this does not exist, you can set it up as below.
- Assign an Access Persona with search access. If this does not exist, you can set it up as below.
Add a new Lentune User
Refer to Add a new Lentune User to set up the new User code for your auditor.
You should also assign the Staff settings for this User.
Security Group
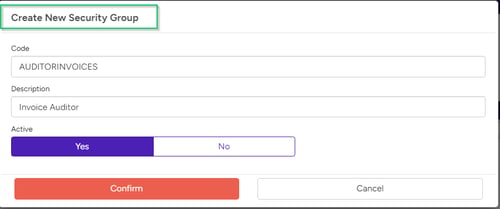
We recommend setting up a Security Group for your Invoice Auditor. In the example below we've set up a Security Group called AUDITORINVOICES.
- Start at Settings > Security Group and click New Security Group.
- Add a Code and Description, and then click Confirm.
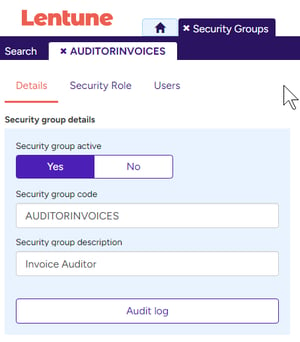
This takes you to the Details screen where you can view and edit these details:
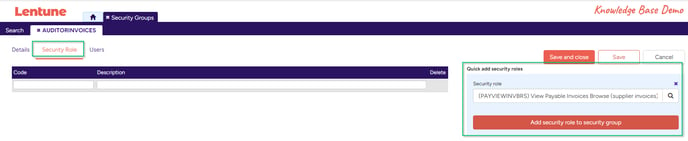
Assign the Security Roles to the Security Group
Remain in the Security Group screen that you created above. Now you can assign the Security Roles that are required for an Auditor User.
The Security Roles you need to assign to this Security Group are:
-
- Payable View Invoice Browse.
- APA Search Confidential Invoices.
- APA User.
- Staff member.
-
Click the Security Roles tab, and in the Quick add security roles section on the right hand side of your screen:
-
Search and select the first Security Role you want, then click Add security role to security group.
-
Add the remaining Security Roles to the Security Group, and then click Save.
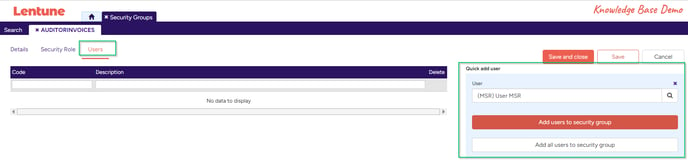
Add User to the Security Group
The next step is to assign your auditor User to the new Security Group.
-
Remain in the Security Group and click to the Users tab. In the Quick add user section:
-
Search and select the User who you want to assign to this Security Group.
-
Click Add user to security group, then click Save and close.
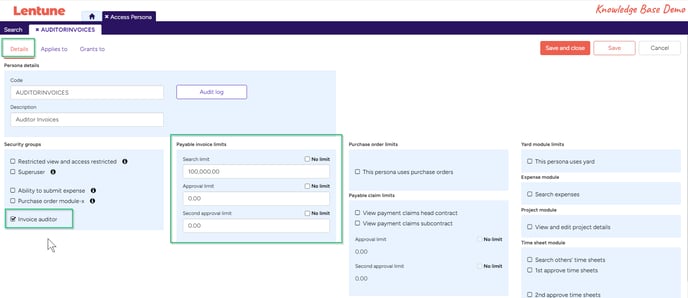
Access Persona
To allow an auditor to view invoices, you can set up a new Access Persona with search access only. This will give them access to search but not accidentally approve invoices.
- Start at Settings > Access Personas and click New Access Persona.
In the Details tab:
- Add a Code and Description.
In the Security Group section:
- The new Security Group you set up above will appear in the list of Security Groups that are available in your database. Check the tickbox for this Security Group, e.g. Invoice Auditor.
In the Payable invoice limits section:
-
Search Limit: Assign a search limit, or check the No limit box above this field, as you require, and click Save.
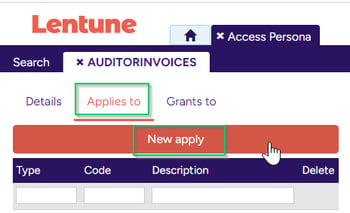
Apply the Access Persona to the Company
Now you can apply the Access Persona to the part of your organisation that you want. Remain in the Access Persona.
- Click the Applies to tab then click New apply.
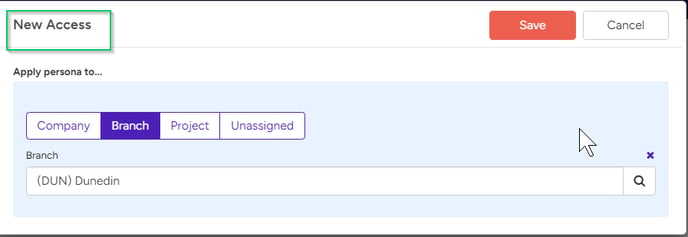
In the New Access screen:
- Select only one of Company, Branch, Department or Project to assign this Access Persona to and click Save. In this example screenshot, we've selected the Dunedin Branch.
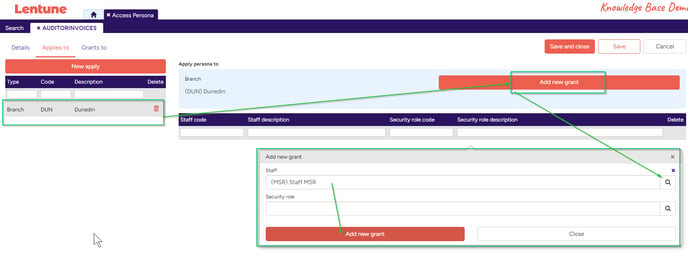
Grant the Access Persona to the User
Now you can grant this Access Persona to the required User. Remain in the Applies to tab.
- Click the Apply that you have just created to highlight it. This will be displayed on the left of the screen.
- Click Add new Grant.
This brings up the Add new grant window on the right hand side of your screen.
- Search and select either the User or Security Role that you want to grant this Access Persona to. In this example screenshot, we've selected User MSR.
- Click Add new grant.
- Then click Close, and then click Save and Close.
Need more help? We’re here! We hope our article was helpful! If you need more info or want to connect, drop us an email at support@lentune.com.
Thank you. We love to hear from you!
Last updated: 9 April 2024