Logo and Header & Footer banners
~ Customer Address - Statement
~ Your Company Name - Statement
~ Your Company Phone Number - Statement
Introduction
You can customise various details that will appear on your invoices and statements.
Some details can be set as a Company-wide while some can be set at Branch, Account Type or Account Type Group level.
Logo and Header & Footer banners
The same banners are used for Invoices and Statements.
These are set up for the Company. All Branches that belong to the Company will use the same Banners. Refer to Header and Footer Banners on your documents to read about this.
INVOICE
These fields can be set in your database to show the details you require.
Top section
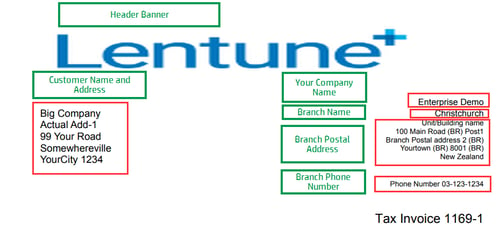
Lower section
Customer Address - Invoice
The Customer address in the top left comes from the Actual Address for the Entity for the Receivable Account.
Go to Receivables > Receivable Accounts.Your Company Name - Invoice
The Company name (i.e. the Company that the Branch belongs to).
- Go to Settings > Companies.
Your Branch Name - Invoice
The Branch name that the Receivable Account is associated with.
- Go to Settings > Branch > Details tab.
- Branch name (for external documents): This field will appear on your invoice if filled.
Your Address - Invoice
This is the Postal Address for the Branch that this Receivable Account is associated with.
- Go to Settings > Branch.
Your Phone Number - Invoice
Branch Phone Number: The Branch Phone Number for the Branch that this Receivable Account is associated with.
- Go to Settings > Branch > Details tab.
- Branch phone number: This field will appear on your invoice, if filled.
- Contact details: If you have entered any Phone contact details on the Contact Points tab for this Branch, these will all appear on the Details tab and will also print on your invoice. Note that the Branch phone number field, if filled, will also appear on the invoice.
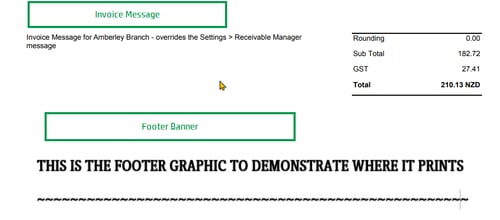
Invoice Message
The message at the foot of the Invoice can be taken from three different places, depending on whether or not you want it to be specific to Receivable Account Types or Branches, or general to all Branches.
Priority 1.
Receivable Account Type: The field in the Messages section called Override invoice standard message for the Receivable Account Type that this Receivable Account belongs to.
- Go to Receivables > Receivable Account Types.
If that field is blank, the system looks for:
Priority 2.
Branch: The field in the Messages section called Override receivable invoice standard message, for the Branch that this Receivable Account belongs to.
- Go to Settings > Branch.
If that field is blank, the system looks for:
Priority 3.
Receivables Manager: The field in the Standard Messages section called Invoice standard message.
- Go to Settings > Receivables Manager.
STATEMENT
Customer Address - Statement
The Customer address in the top left is taken from the Actual Address for the Entity of the Receivable Account.
- Go to Receivables > Receivable Accounts.
Your Company Name - Statement
The Company name: Company name (i.e. the Company that the Branch belongs to).
- Go to Settings > Companies.
Your Address - Statement
The Company Postal Address for the Company that the Branch belongs to.
- Go to Settings > Companies.
Your Company Phone Number - Statement
The phone number that prints on the Statement is taken from the Company Details tab.
- Go to Settings > Companies > Details tab or Contact Points tab.
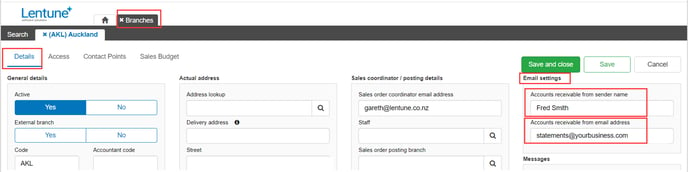
Email From Address - Statement
The From email address for your Statements can be set at Branch level and Receivable Account Type level. The Branch setting is used in preference if that is populated. If that is blank, the Receivable Account Type setting is used.
Branch - Email Address
- Go to Settings > Branch.
- Select the Branch you want.
- Go to Email Settings.
- Accounts receivable from sender name: Enter the name to appear as the Sent From name.
- Accounts receivable from email address: Enter the Email address to appear as the Sent From email address.
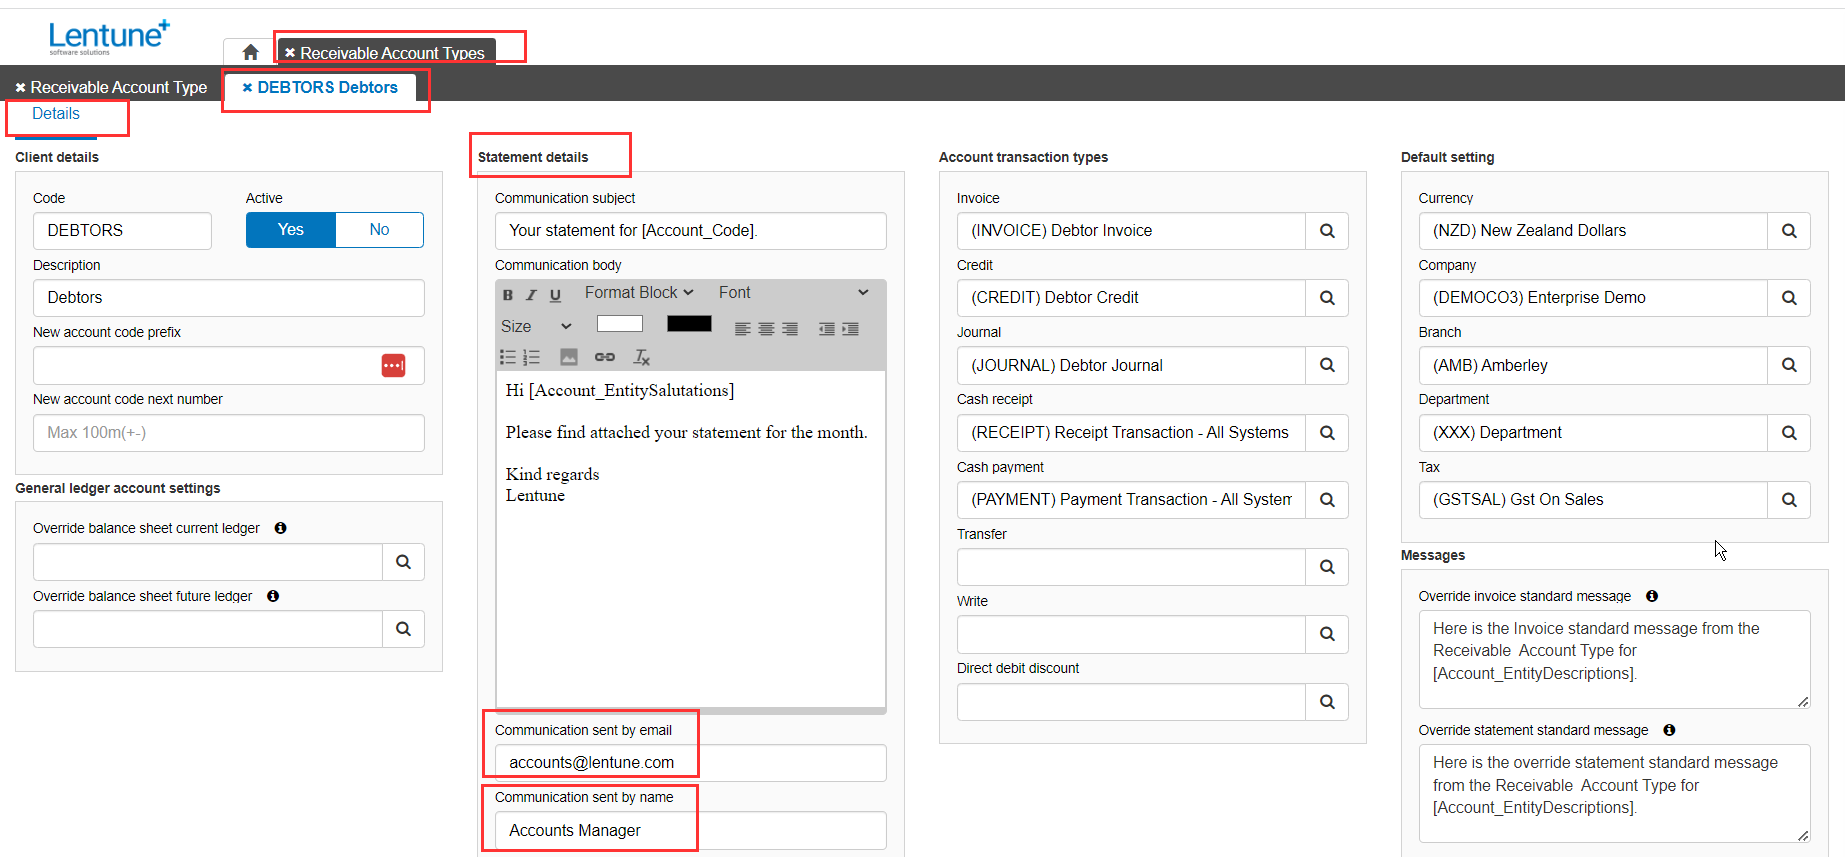
Receivable Account Type - Email Address
- Go to Receivables > Receivable Account Types.
- Select the Account Type you want to edit.
In the Statement details section:
- Communication sent by email: Enter the From Email address to appear on Statements.
- Communication sent by name: Enter the From Name to appear on Statements.
Statement Message
Priority 1.
- Go to Settings > Branch.
If that field is blank, the system looks for:
Priority 2.
Receivable Account Type: The field in the Messages section called Override statement standard message for the Receivable Account Type that this Receivable Account belongs to.
- Go to Receivables > Receivable Account Types.
If that field is blank, the system looks for:
Priority 3.
Account Type Group: The field in the Messages / watermarks section called Statement Standard Message from the Account Type Group that this Account Type belongs to.
- Go to Settings > Account Type Groups.
Need more help? We’re here! We hope our article was helpful! If you need more info or want to connect, drop us an email at support@lentune.com.
Thank you. We love to hear from you!
Last updated: 6 November 2023