Set up General Ledger Account Type
Set up General ledger codes for on-charge rate
Introduction
Where you receive Supplier invoices that relate to a job you are working on for a customer, you may wish to add a margin percentage and on-charge these to the customer.
You may on-charge the complete invoice, or select the specific invoice lines that you wish to on-charge. All lines on one invoice will be charged to the same revenue code at the same on-charge rate.
You can set the specific on-charge rate for the Revenue code on the General Ledger accounts screen.
This feature to on-charge invoices is available in the Check / Approve invoices screens, and allows you to add your margin to the invoice, and send it to your invoicing system, to be on-charged to your customer.
You may also search for invoices that have been on-charged in the Invoice screen. This allows the administrator to easily find on-charged invoices and flag them as Successfully on charged.
Before you can use this feature, you will need to specify the General Ledger Account type to be used for the revenue, and you can also set up the on-charge rates for the General ledger Revenue codes that you expect to use. However, the on-charge rate can also be applied directly in the on-charge invoice screen.
Set up General Ledger Account Type
To be able to implement this feature, you need to specify the General ledger Account Type to be used. This should be a General Ledger Account Type that includes the revenue codes you wish to use for on-charging.
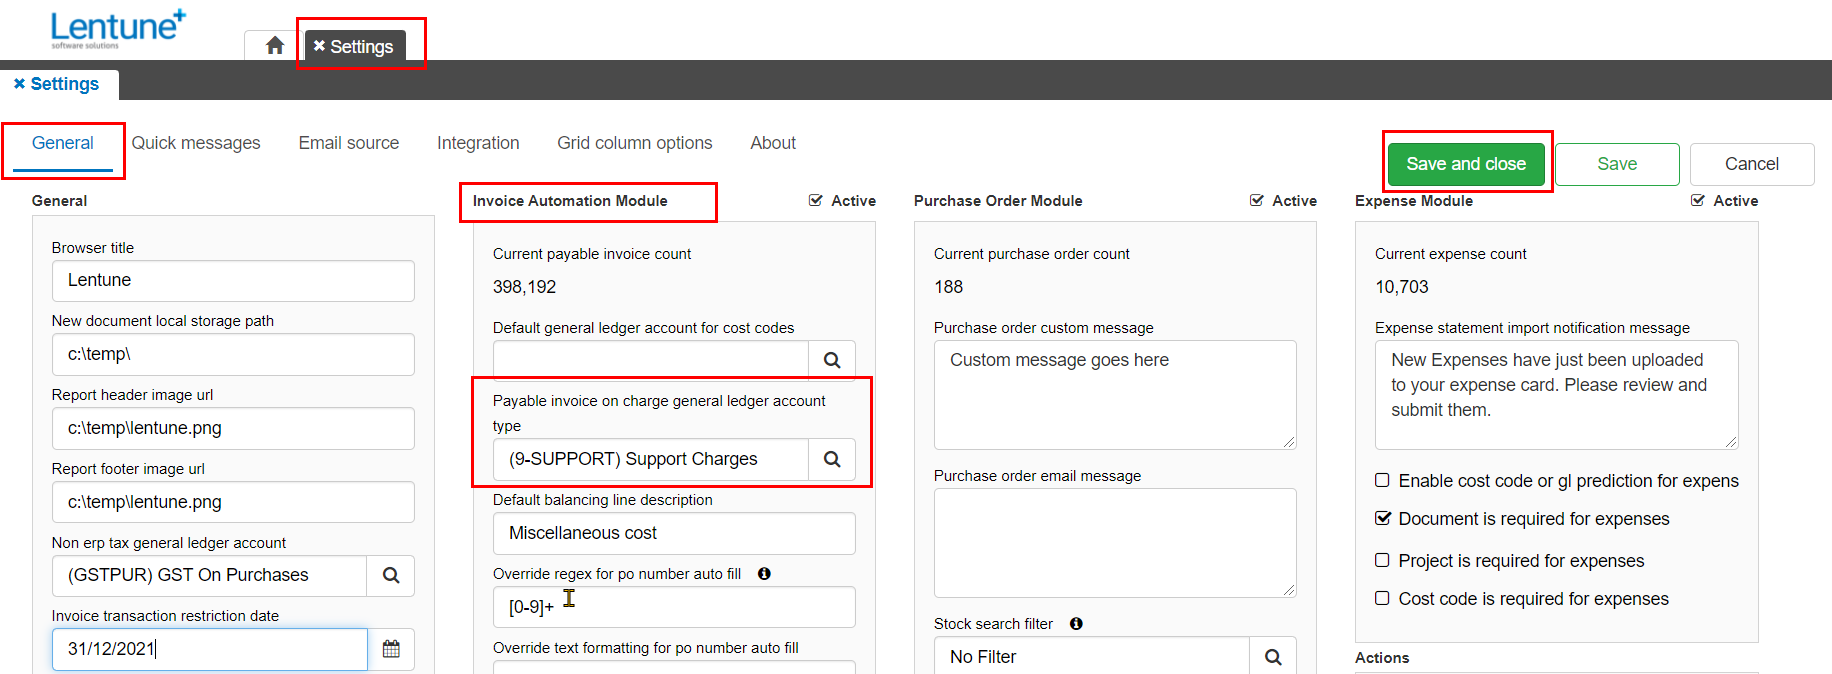
- Go to Administration > Settings > Invoice Automation module section.
- Go to Payable Invoice On Charge General Ledger Account Type.
- Select the General ledger Account Type that you wish to use from the dropdown list.
- Click Save and Close.
Set up General ledger codes for on-charge rate
If you wish to set up the default on-charge rate for a General ledger Revenue code, it will be used in the on-charge invoice screen.
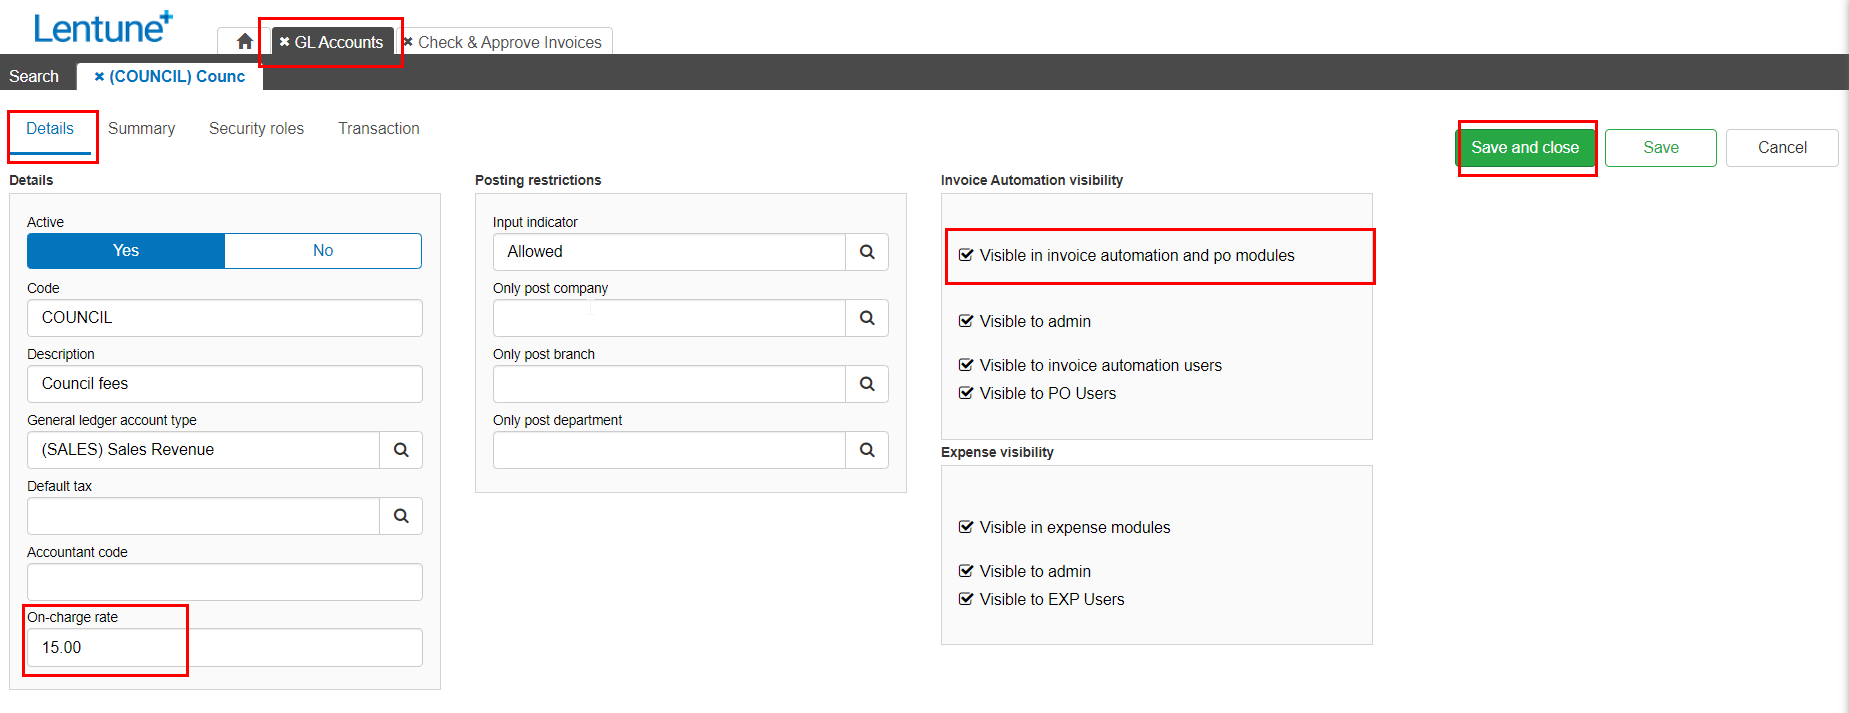
- Go to General ledger > General ledger accounts.
- Select the account you wish to use and go to the Details tab.
- In the Details section, enter the On-charge rate.
- In the Invoice Automation visibility section, ensure that the field for Visible in invoice automation and PO modules is checked.
- Click Save and close.
On charge Invoices from Check and Approve Invoices screens
- Go to Invoice Automation > Check or Invoice Automation > Approve.
- Select the required invoice.
- Click More.
- Select On charge.
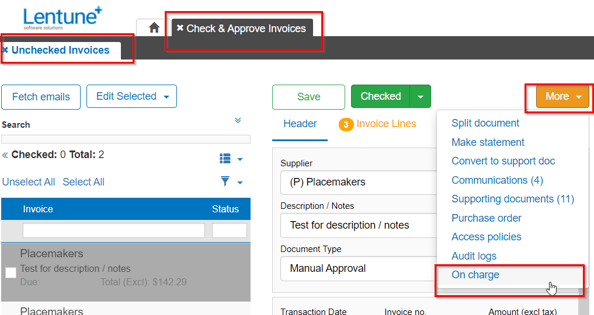
This takes you to the Invoice on-charge screen.
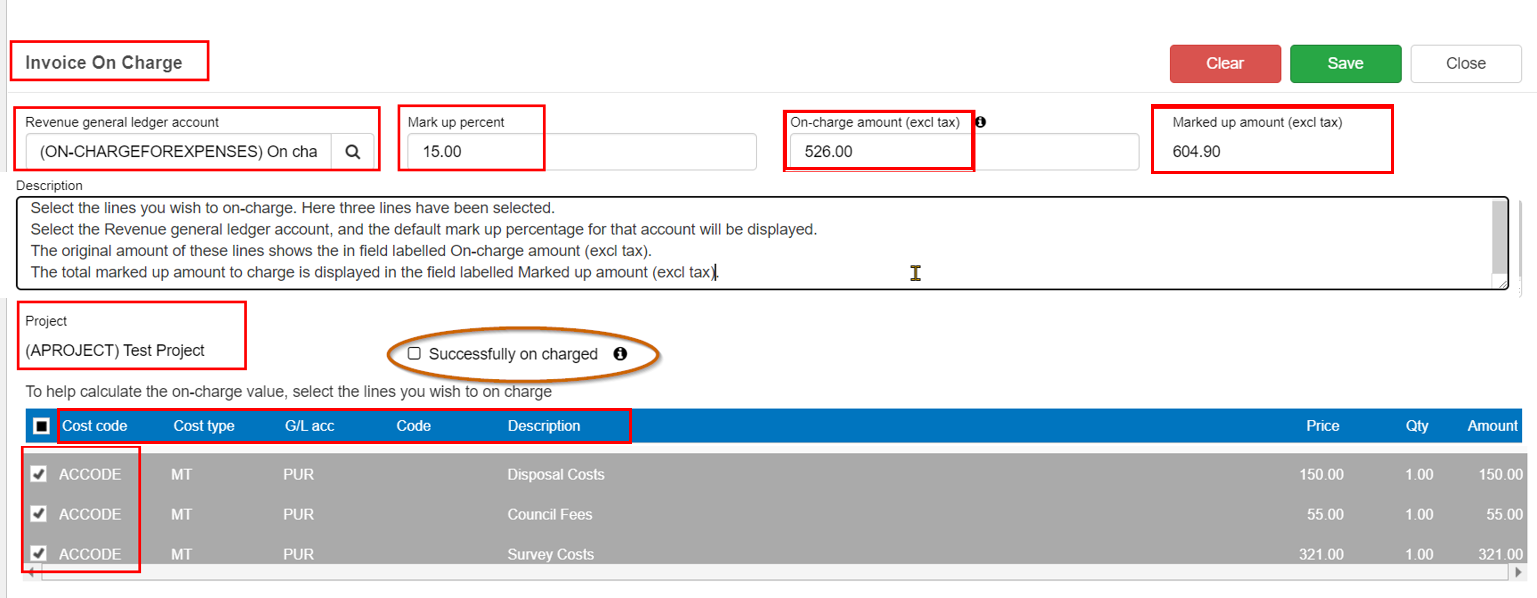
- Select the Revenue general ledger account to code the on-charge amount to in your General ledger. General Ledger codes with the General ledger Account Type set to Revenue will be available to select from.
- Mark up percent. The mark-up rate for this General ledger account will be displayed, but can be overwritten if required. This will auto-calculate the Marked up price (excluding GST).
- Enter a Description, if required.
- Select the lines that you wish to on-charge. The Cost Code and Description fields help you select the appropriate lines to be on-charged.
The total will be displayed above in the On-charge amount (excl tax) and Marked up amount (excl tax) fields.
TIP: Your Administrator or Accounts Manager can then on-charge the amounts to your customers in your Creditors / Receivable Accounts system. Then they can return to Lentune to update the flag to show that the amount has been on-charged.
- Successfully on charged. This field allows your administrator to update the record when it has been successfully on-charged. Once they have on-charged the amounts to the customer, they can return to this invoice and check this field.
- Click Save.
The checkbox for Successfully on charged would normally be checked by an administrator after this data has been successfully transferred to your invoicing system.
When the administrator returns to flag this field, the User and date and time stamp is recorded and displayed next to the field.

Any User who can view the invoice will be able to open, view and edit these fields.
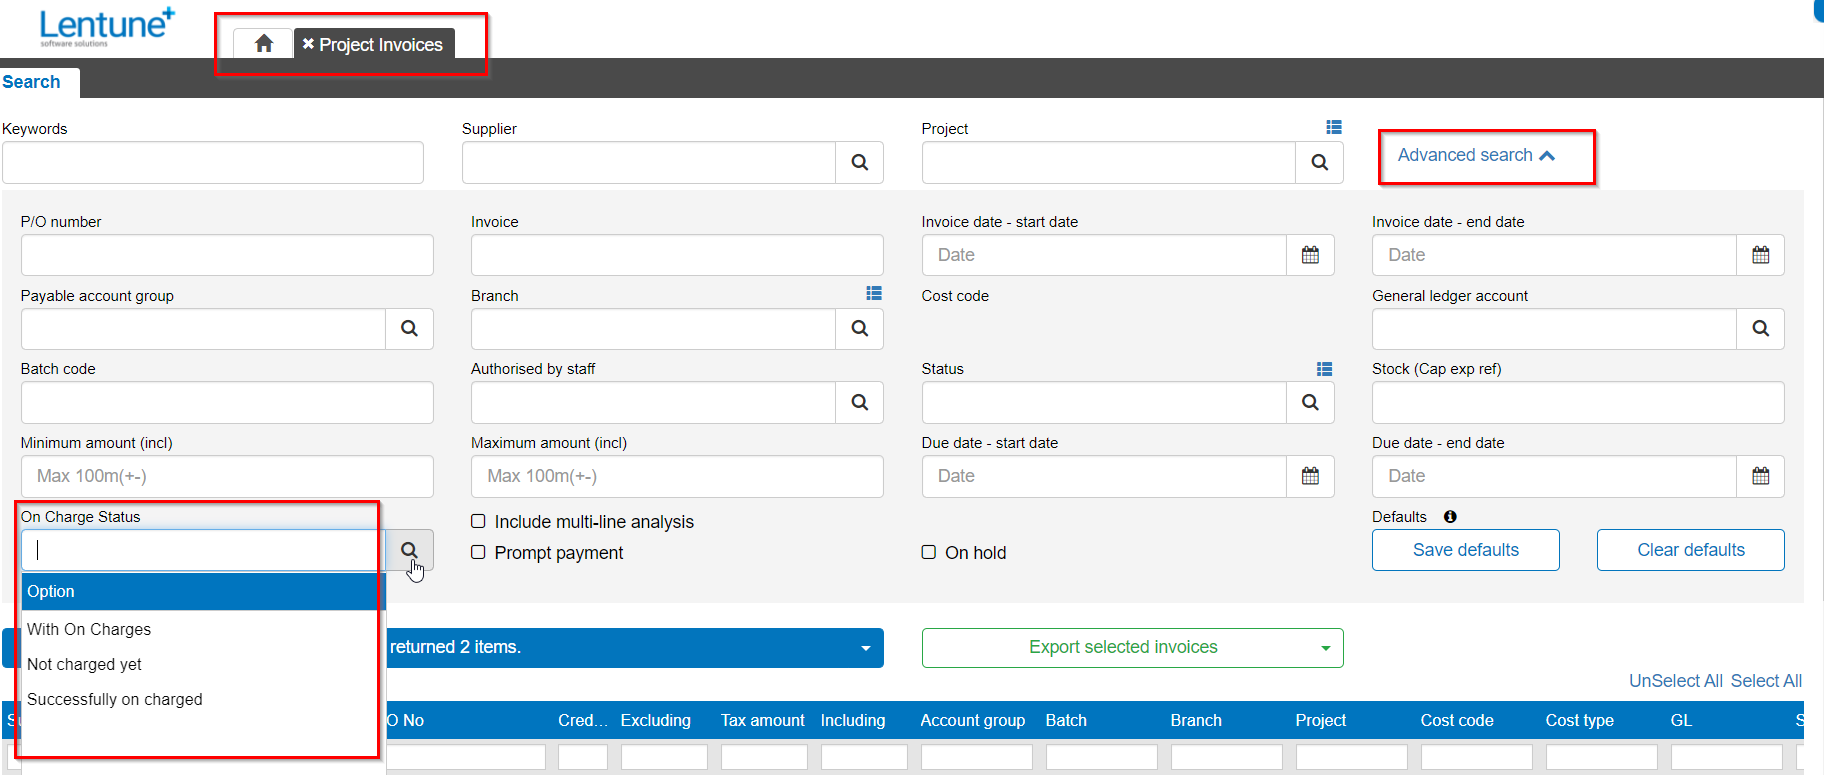
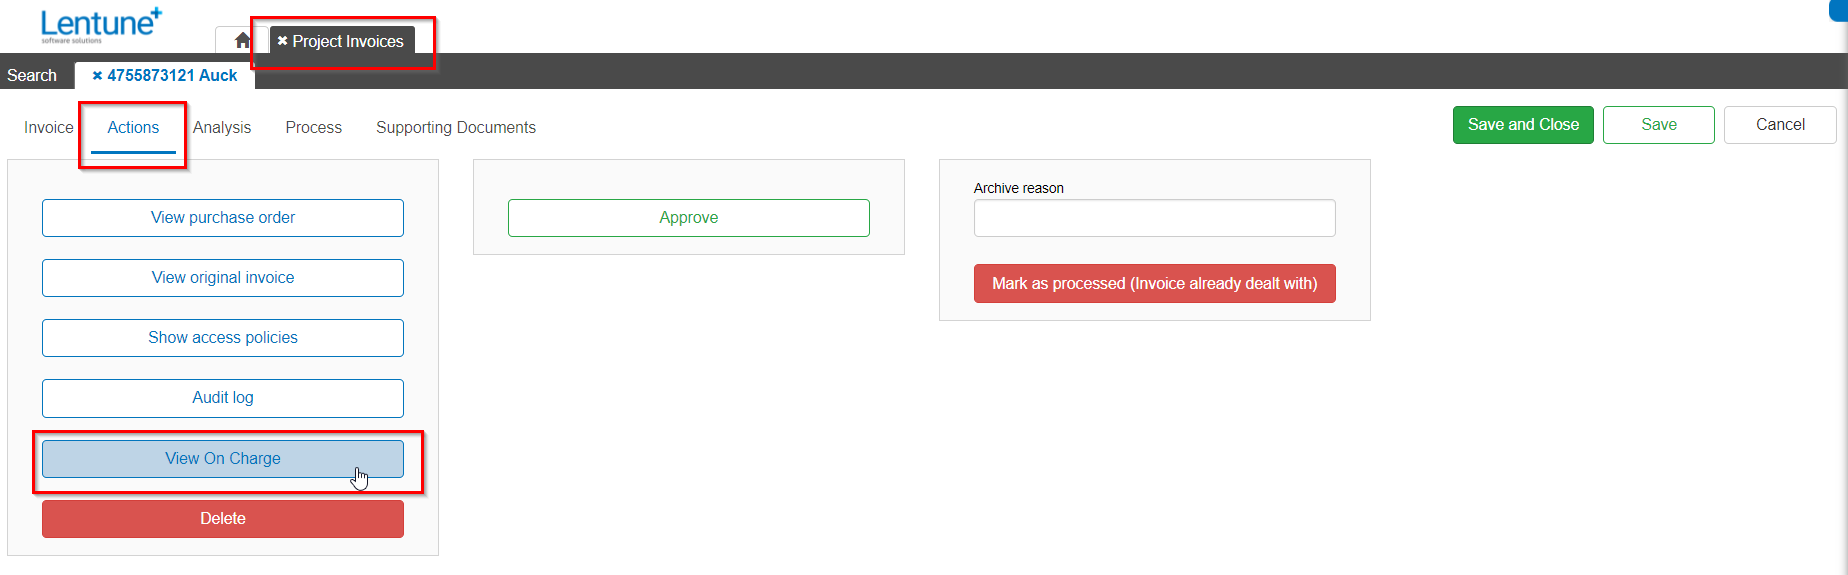
Search for on-charged invoices from the Invoice Screen
You may search for invoices that have been on-charged from the Invoice screen. This allows the administrator to easily find on-charged invoices in order to flag them as Successfully on charged.
Any User who can view the invoice will be able to open, view and edit these fields.
- Go to Invoice Automation > Invoices.
In the Advanced search you can search for invoices that have an On-charge. There are three options in the dropdown list for this field:
-
- With On charges.
- Not charged yet, i.e. this invoice has an On-charge that has not yet been marked as Successfully On charged.
- Successfully On charged.
- Click Search to display invoices that match your search criteria.
- Select the invoice you wish to view or update.
- Go to the Actions tab.
- Click View On charge to view or add an on-charge, or flag it as Successfully on charged.
- Click Save and Close to save your changes.
Was this helpful? If you require further assistance or would like to contact us about this article, please email us at support@lentune.com.
Thank you. We value your feedback.
Last updated: 20 June 2023