Checking Invoices - How it works
Lentune’s automation at the Check Invoices stage
Introduction
This article is a general overview of how the checking invoices process works. To read more detailed instructions of how to do this, refer to Checking an invoice for approval.
Checking Invoices - How it works
As a checker, you are responsible for confirming the attachment that has been imported:
- is an invoice.
- is for the correct company.
- has the correct invoice details populated.
- is sent to the correct users for approval.
Lentune’s automation at the Check Invoices stage
The Lentune invoice automation software is designed to eliminate data entry from your business. Most of this automation occurs at the checking stage. Once details for your Suppliers have been set up we can auto-populate the Invoice details, Line items, Invoice due date, Job details and Approvers.
Invoice details
Lentune auto-populates key invoice details using TeachMe technology. Based on the Supplier, Team Lentune will set up TeachMe rules to find and extract the Invoice date, Invoice number, Purchase Order number, Gross dollar amount, GST (tax) dollar amount and net dollar amount.
TeachMe rules are set up per Supplier, as each Supplier's invoice layout is unique. Lentune automatically detects when a new invoice enters your system and will set the rules up for you.
TIP: If you receive an invoice without these details populating please select the Supplier and click Save. This will notify our team to set up the rules.
Line Items
Lentune can read and extract the line items of an invoice using OCR technology. Lentune stores OCR rules in a centralised location called the Hub. Once OCR rules have been set for the Supplier these rules will be applied to all Lentune customers using this Supplier. You can view the line items captured by navigating to the Invoice Lines tab.
To have the line items populate by default for your invoices please contact support@lentune.com to set these up for you and have them to populate automatically.
TIP: If you need to notify the Lentune Hub if an invoice OCR Rule needs to be corrected, please refer to Notify Lentune of Invoice Mismatch for Invoice Rules.
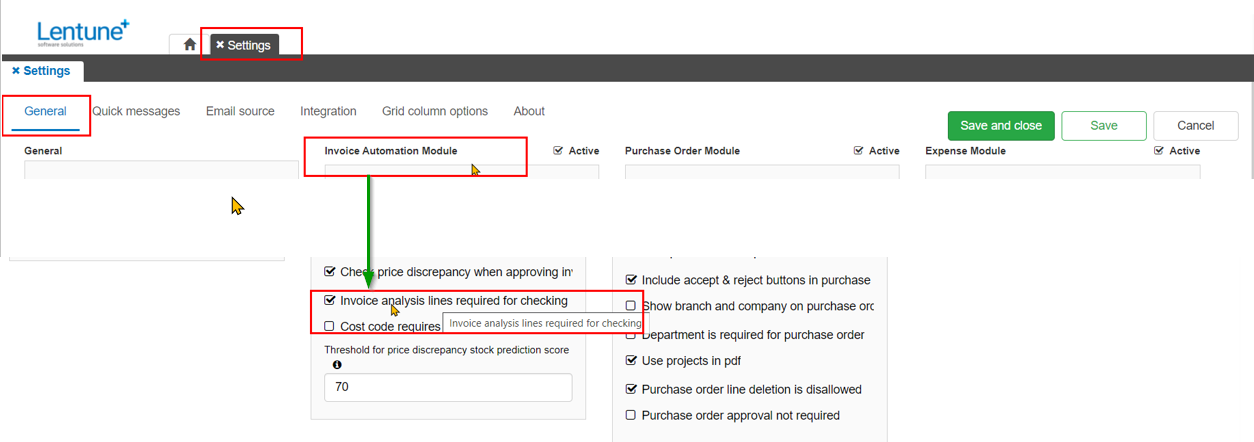
TIP: When using OCR, we recommend that you set the flag Invoice analysis lines required for checking.
To set this flag:
- Go to Administration > Settings.
- In the General tab > Invoice Automation Module section:
- Scroll to the foot of the page.
- Check the field Invoice analysis lines required for checking.
- Click Save and Close.
Purchase Order
If there is a Lentune Purchase Order number on the invoice then Lentune will find the Project and Cost Code from the Purchase Order and apply it to the invoice. Lentune will also display the Purchase Order next to the invoice on the right of your screen to allow you to view the two side by side.
Please note: the Purchase Order number must be entered in the Purchase Order field exactly as it is listed in Lentune. If there are any extra characters or spaces then Lentune can’t recognize it.
If the PDF for the Purchase Order does not show, clear the Purchase Order number field, re-add the Purchase Order number and click the Purchase Order tab beside the Invoice tab on the right section of the screen.
Due date
Lentune can auto-populate the due date for your invoices. The data populated for the due date is set based on the Supplier's payment terms as stored in your Payables settings.
To set the payment terms:
- Go to Administration > Payables.
- Double click the Payable Account that you want to set the terms for.
- Select the Payment term.
- Click Save and Close.
Default Approvers
You can set default approvers based on the Project or the Supplier. If default approvers are set up in your Invoice Administration settings, Lentune will populate the approver based on the Supplier for the invoice.
To change your default approvers :
- Go to Administration > Payables.
- Double click on the Payable Account that you want to update.
- Update the default 1st approver and default 2nd approver.
- Click Save and Close.
Updating Payables
If you need to do a bulk update for your Payables, e.g. update the Payment terms, you can export the Payable records to a spreadsheet. Then edit the required field/s and reimport the spreadsheet.
To do this:
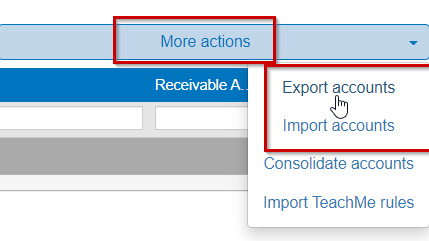
- Go to Administration > Payables.
- Select More actions.
- Select Export accounts.
This will create a spreadsheet that you may edit.
- Then from the same screen, select the Import accounts option.
Note: You must have the appropriate Security role assignments to complete this task.
Checking an invoice for approval
To read detailed instructions of how to check invoices for approval, refer to Checking an invoice for approval.
Was this helpful? If you require further assistance, or would like to contact us about this article, please email us at support@lentune.com.
Thank you. Your feedback is appreciated.
Last updated: 5 May 2022