Checking Invoices – the More button
Checked - Flag the invoice as checked
Introduction
On the Invoice Automation menu tab, you can see how many invoices are waiting for checking and approval.
Your Lentune system will be set up to fetch new invoices from your email inbox. This will occur as a regular scheduled task, usually hourly.

TIP: If you have the same person checking and approving all invoices, you can set a control field to allow this to be done in one click. Refer to Check and Approve Invoices in one Step to see how to set up this feature.
Checking an Invoice
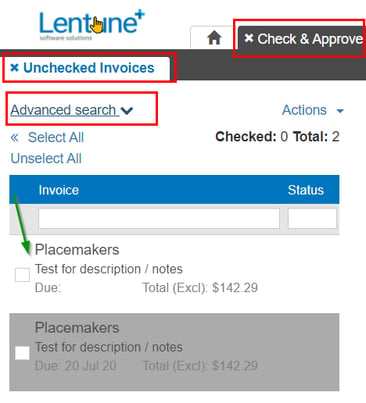
- Go to Invoice Automation > Check.
This takes you to the Check and Approve Invoices tab which displays all the invoices that are ready to be coded and checked into the system.
TIP: There are many filters you can use to Search for an invoice.
Refer to Advanced Search filters to read more about this.
- Click the invoice that you want to check.
Invoice Header
The Invoice header has sections for Supplier details, Transaction details, Status flags and Analysis coding for this invoice.
Various fields will be pre-populated if they have been set up as defaults for this Supplier. These display on the Invoice Header in the top part of that screen.
Check that the Invoice details are correct:

-
Supplier details section
If we have the rules set up to read the invoice for this Supplier, the details from the invoice will also be brought in. If required, you may overwrite the defaults to change any details.
The Supplier fields will be populated once we have that Supplier email address loaded into the system.
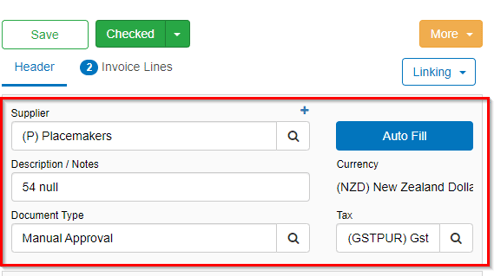
Supplier: Once the email address has been linked for this Supplier, this field will be populated when the invoice comes in.
If the Supplier field is empty, you may select the Supplier from the dropdown list.
Tip: If this Supplier has not yet been set up in your system, you may do this by clicking on the blue plus icon  above the Supplier field. Refer to Add a New Supplier to learn how.
Description / Notes: This displays the subject of the email sent with your invoice. You may overwrite this if required.
Document Type: This is normally set to Manual Approval.
Auto Fill: If these fields are blank, you can select Auto Fill. Refer below.
Currency: This is the default currency for this Supplier.
Tax: This would usually be your Tax code for purchases. e.g. GST.
If the Supplier field is blank, it may be because either:
- The email address that the invoice has been sent from has not been recognised, or:
- This may be a new Supplier.
Email address not recognised
If the email address that the invoice has been sent from has not been recognised, you may add it.
To do this:
-
- Search for the Supplier.
- Click the Auto Fill button. This will then populate the fields according to the rules for that Supplier.
New Supplier
If this is a new Supplier that has not yet had rules set up, you may do that here for this invoice. To do this, either:
a) Fill out the details from the invoice.
-
- Click Checked;
or:
b) Ensure that the Supplier name field shows the correct Supplier name. - Click Save.
- Click Checked;
If the Supplier email has not yet been saved in the system, you can do this when you are checking the invoice. Read about Linking a Supplier email.
-
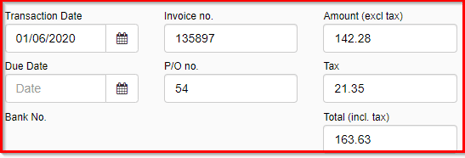
Transaction details section
In the Transaction details section the Dates, Invoice number, Purchase Order number and Amounts for the invoice are displayed. - Check that the Invoice date, Invoice number, Purchase Order number and dollar amounts are correct.
-
Due date will default to the setting in the payment terms for the Supplier, if this has been set up.
-
Status flags section
You can use set any of these status options when checking in your invoices.

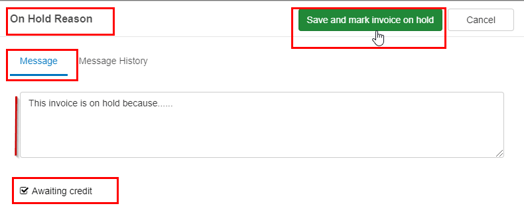
- On hold: Put this invoice on hold, e.g. if there is a query for this invoice. When you check the box to put this invoice on hold, a small modal screen pops up where you can add a reason for holding this invoice. From the first screen, click the edit icon
 to return to the reason screen, if required.
- Add a reason if required, and click Save and mark invoice on hold.
- If you have requested a credit, check the box Awaiting credit.
- You can also view message history of messages relating to the hold of this invoice.
- When the issue is resolved, or credit received, you can remove the tick in the On hold box.
NOTE: Invoices that are On hold can be reported from Invoice Automation > Analytics. Select the On Hold tab or Awaiting credit tab from the foot of the screen.
- Confidential: An invoice that may contain sensitive information may be marked as confidential and then may be viewed only by users with the appropriate security role. This may also be set up on the Supplier record.
- Credit Note: Check this field if this is a Credit Note and it has not been checked automatically. The numbers will be displayed as negative values.
Tip: If a Credit Note rule has been set up for the Supplier, the box will automatically be checked. If the Credit Note box is not ticked and you tick it, Lentune will be notified to set up a Credit Note rule for future credit notes.
- Prompt Payment: This will send an email to whoever is approving the invoice to let them know they have a prompt payment invoice waiting for their action. Otherwise, emails are not sent to approvers, as a scheduled task would be set up for them to remind then to do this.
- Single approval only: If your system is set up to use dual approval, you may mark this particular invoice to require only one level of approval.
-
Analysis coding section
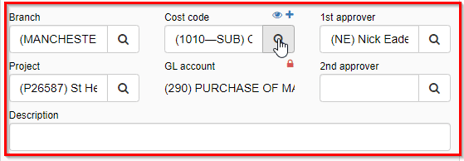
These details appear in the bottom section of the Invoice Header display, and default to settings from the Supplier.
Check that these fields are correct. You may overwrite these codes for this specific invoice if required.- Branch: The Branch that this invoice relates to.
- Project: The Project that this invoice relates to.
- Cost code: The Cost code for this invoice.
TIP: To read about adding or editing the Cost Code on an invoice or invoice line, refer to Add a Cost Codes from the Master Cost Codes while approving invoices.
- GL code: The General ledger code that this invoice relates to.
- 1st approver: The 1st approver user.
- 2nd approver: The 2nd approver person, if required.
Tips:
- If there is a Purchase Order on the invoice then the Project and Cost Code will apply based on what the Purchase Order was raised for.
- If there is a Purchase Order but no Project or Cost Code populating, then make sure the Purchase Order number has been entered correctly. If there is still no coding, then it means the Purchase Order was raised without a Project and Cost Code.
- You can Check Invoice total to Purchase Order total by checking the totals above the invoice display.
Invoice Line details
If your system is set up to view invoice lines, you may check the lines details for this invoice.
For Lentune to read the line items from an invoice, OCR rules must be set up for the Supplier and line item analysis must be enabled. Read more about this here.
To have OCR rules set up, please contact support@lentune.com with the list of Suppliers you would like OCR turned on for and we will get them set up to automatically populate. We traditionally set up your top 10 Suppliers with OCR.
- Click on the Invoice Lines heading in the centre section of the screen. This will display the individual lines that you can then match to the invoice.
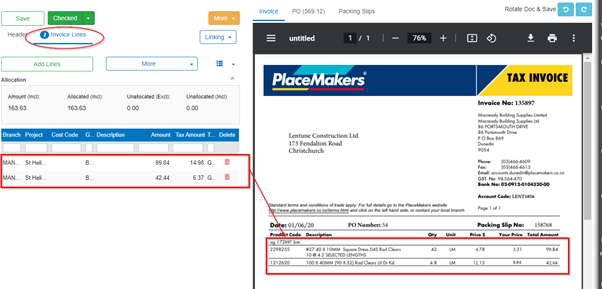
Invoice Line display
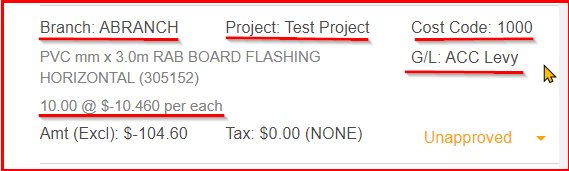
Each Invoice line will display the details that relate to it for Branch, Project, Cost code, General Ledger account, Description, Quantity, Amount and Tax. This provides a quick view of the line details.
Note: Branch, Project Cost code and General Ledger account do not need to be set at line level, in which case these fields will be blank.
To view these fields in more detail or alter anything, click into the line to bring up the Edit line details window:

Splitting Invoice Lines
You may add lines manually if you need to split the amount to analyse expenses for separate codes.
To learn more about splitting Invoice lines, click Splitting Invoice Lines.
Invoice Lines > More
From the More button on the Invoice lines screen, you have access to Fetch new invoice lines, Import Invoice lines, and Balance Tax.
-
- Fetch allows you to fetch new invoice lines for that invoice. For very large invoices, please refer below.
- Import allows you to import new invoice lines from a .csv or .xlxs file. Refer to Import Invoice Lines for more details.
- Balance Tax allows you to allocate any small unallocated balance to tax, if you wish.

TIP: Fetching large documents
If you receive an invoice document that is more than 20 pages long, it will take some time to create the invoice lines for the document lines. This will not be done automatically for such a large invoice document. Instead, you can do this manually, to allow you to perform the import of your large invoice to suit a convenient moment.
This is done using the Fetch for large documents option on the More button in the Invoice Lines.
In the Check invoice screen:- Click Invoice Lines.
- Click the More button.
- Select Fetch for large documents.
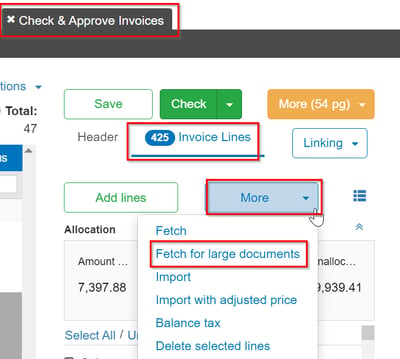
This will create the invoice lines regardless of the document’s page count. For a document that has more than 20 pages, there will be a delay of 0.25 seconds between each line. This alleviates disturbing other users while your fetch is being processed.
Purchase Order / Packing Slip
If a Purchase Order has been generated and matches the Purchase Order number on the invoice, it will appear at the top of the screen where you may view it.
If there is a Packing Slip uploaded against the invoice, it will also appear here.

Checking Invoices – the More button
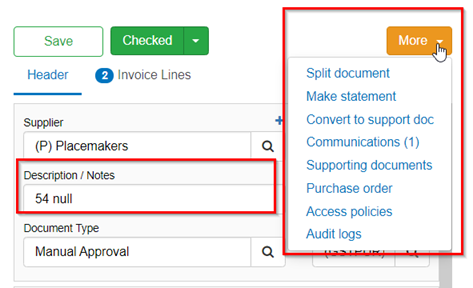
The More button will change from a clear background to orange if there are Communications or where the document has been Split to multiple pages. The number of Communications or Split documents will be shown beside the respective heading.
- Split Document: This allows you to split multi page documents, e.g. if several invoices have been sent in the same PDF.
- Make Statement: This allows you to identify Statements that come into the system. They will be moved from this queue into the Statements section.
- Convert to Support doc: If a document that is not an invoice. e.g. Terms and Conditions, has come in to the invoice emails, you may convert it to a support document. This will then be attached to all incoming emails for this Supplier.
NOTE: Do not do this for an invoice!
-
Communications: This allows you to email either internally or externally regarding an invoice. A log of this communication will be kept against the invoice in Lentune. All emails will be done from your own inbox. You may also create a message, without emailing it, that will be attached to this invoice. In this case, leave the Email address field blank. Click here to see how.
-
Supporting Documents: This allows you to upload any further supporting document if you wish. Click here to read more about how to do this.
-
Purchase Order: This allows you to view a Purchase Order for this invoice.
-
Access policies: This displays the access limits for staff users who may approve or view this invoice. These limits are set up in the Administration module.
-
Audit logs: This displays the date and time when an invoice was updated.
Checked - Flag the invoice as checked
When you have completed any checks required:
- Click the Checked button to move this invoice to the approving stage.
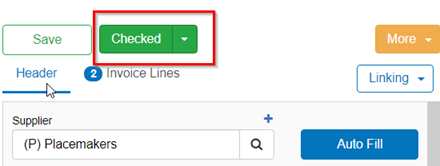
The next invoice for checking will automatically be displayed.
Check and Approve in one step
If you have the authority to check and approve an invoice, you don’t need to assign the invoice to anyone. In this case, you can:
- Select the dropdown option from the Checked button.
- Select Checked and approved.
This completes two tasks at once.
Send an invoice back to be re-checked
If you find something on the invoice that might need to be re-checked, you can flag it to go back to the team or person who performs that task. Click here to learn how to do this.
Watch the Video 
Prefer to watch the video? Andrew takes you through step by step...
Need more help? We’re here! We hope our article was helpful! If you need more info or want to connect, drop us an email at support@lentune.com.
Thank you. We love to hear from you!
Last updated: 12 February 2024